|
|
|
Written by Ferlin Scarborough
Goal of the lecture
The goal of this lecture is to introduce the student to the RPG Toolkit. By the end of the lecture the student should be familiar with the basic operation of the program and how to navigate through the RPG Game Development System.
Hey there, Ho there and Hi there.
Hello students and thank you for taking the time to participate in this course.
First a little introduction to the Teacher. My name is Ferlin Scarborough. I am 38 years young and have been in programming for over 18 years now. I have always had a special place in my heart for RPG Games. So of course when I discovered the RPG Toolkit it was only natural that I download it and give it a try.
If you need to contact me, use either my email at gameprogramming.org or use the course forum. If you have any questions, the course forum is a good place to see if there is anyone who can help you, and you would probably get a faster answer than from me.
What is an RPG?
RPG is short for Role Playing Game. Being from the Old School, I played RPG's on the original Nintendo Entertainment System, some of my favorites were the Zelda and Dragon Warrior series. If you are familiar with these games then they are good examples of RPG's.
To obtain RPG Toolkit, please download it from its official homepage, www.rpgtoolkit.com.
Please download Version 2 since version 3 is in alpha and some things have been changed from version 2.
Version 2 is what the lectures will be based on in this class.
Concepts of a basic RPG.
Most RPG's have a back story or plot, a task to be performed, and a reward for completing the task (in future lectures we will go into more details on each of these points). The story or plot keeps the player informed of what is going on, and why they are doing what they are. A task is usually called a Quest and the reward is usually great enough to warrant the player undertaking the quest in the first place. For most RPG's there are 3 basic plots, within those plots are sub plots.
Introduction to the RPG Toolkit.
Now it is time for me to introduce the RPG Toolkit so here goes. RPG Toolkit meet Student, Student meet RPG Toolkit.
What is the RPG Toolkit?
The RPG Toolkit is an extremely flexible development system designed specifically for creating Role Playing Games. The toolkit was designed by Christopher Matthews a recent graduate of Dalhousie University in Halifax, Nova Scotia Canada where he majored in Computer Science. The toolkit has been in development for almost 5 years now, and Christopher is almost constantly updating and working to improve the system. The toolkit has a community of RPG enthusiasts that are very helpful and creative, this community is found on the official forum located at http://rpgtoolkit.com.
Toolkit Features.
Some of the features of the toolkit include a fully integrated development environment, True color (24 bit) graphics, parallaxing backgrounds, huge boards - from 19x11x8 layers up to 2048x2048x4 layers and no tile restriction. Built in lighting effects for board drawing, plugin support - use existing plugins, or create your own with C++. A built in language called RPGCode, a built in menu system (skinnable) and a fighting system with the option to create your own. HUGE game worlds limited only by your available hard drive space, multimedia capabilities, extremely simple interface and much much much more.
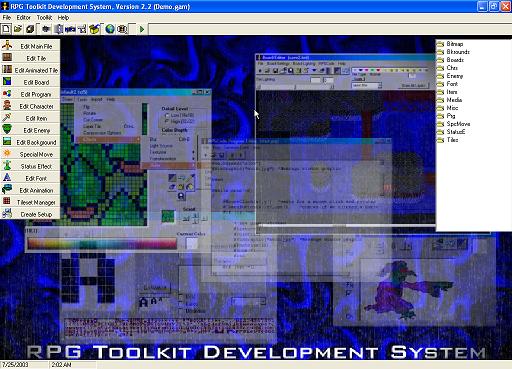 Here is a screen shot of the main toolkit interface, which we will learn more about in this
lecture.
Here is a screen shot of the main toolkit interface, which we will learn more about in this
lecture.
Toolkit Tour Time.
Let's begin by taking a little tour of the interface, and breaking it down a little bit. If you would like you can start up the RPG Toolkit now and look at each of these items. To start the Toolkit click on your start button, then programs, then RPG Toolkit 2, then RPG Toolkit Editor.
At this point you should see the above screen. Let's look at some of the elements on this screen.
The toolkit's interface is a standard Window's program interface, with a menu bar, speed buttons, and a side bar of buttons for different editors going down the left hand side. Let's take a look at the different buttons on the side bar.
Button Button Where's My Button.
Button Side Bar.
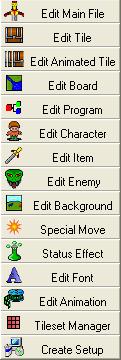 This is what the button side bar looks like. I will tell you a little about each button, we will
get deeper into using these buttons when we start designing our game.
This is what the button side bar looks like. I will tell you a little about each button, we will
get deeper into using these buttons when we start designing our game.
I am going to touch on each of these buttons briefly her to give you an overall idea of what they are for, we will go into greater detail for each one as we use it during our class.
The ![]() button
pulls up the Main File Editor. The Main Project File is the most important file in your
whole game. It contains the information on all the other files in the game.
button
pulls up the Main File Editor. The Main Project File is the most important file in your
whole game. It contains the information on all the other files in the game.
The ![]() button pulls up
the Tile Editor. The games you create with the toolkit are what are known as tile based games. Tile
based games mean that nearly every graphic you see in that game is made up of one or more tiles. A
tile is a little square graphic, that when put together with other tiles creates a larger scene.
button pulls up
the Tile Editor. The games you create with the toolkit are what are known as tile based games. Tile
based games mean that nearly every graphic you see in that game is made up of one or more tiles. A
tile is a little square graphic, that when put together with other tiles creates a larger scene.
The ![]() button pulls up the
Tile Animation Editor. This editor is used to create graphics that are in motion, such as a
moving flame or water.
button pulls up the
Tile Animation Editor. This editor is used to create graphics that are in motion, such as a
moving flame or water.
The ![]() button pulls up
the Board Editor. A board represents a screen in the game.
button pulls up
the Board Editor. A board represents a screen in the game.
The ![]() button pulls up
the RPGCode Editor. RPGCode is a very simple scripting language used to control actions or events
that take place in your game.
button pulls up
the RPGCode Editor. RPGCode is a very simple scripting language used to control actions or events
that take place in your game.
The ![]() button pulls
up the Character Editor. The character editor allows you to set the graphics and parameters for
the characters in your game.
button pulls
up the Character Editor. The character editor allows you to set the graphics and parameters for
the characters in your game.
The ![]() button pulls up
the Item Editor. Items are objects in the game, such as a potion or jewel or some thing the
character can carry or interact with.
button pulls up
the Item Editor. Items are objects in the game, such as a potion or jewel or some thing the
character can carry or interact with.
The ![]() button pulls up
the Enemy Editor. The Enemy editor is used to add the baddies or bad guys to the game.
button pulls up
the Enemy Editor. The Enemy editor is used to add the baddies or bad guys to the game.
The ![]() button
pulls up the BackGround editor. A background is just a backdrop against which the fights in
the game takes place.
button
pulls up the BackGround editor. A background is just a backdrop against which the fights in
the game takes place.
The ![]() button pulls
up the Special Move Editor. A special move is a specialized attack that a player can use
in a fight. It is usually more powerfull than just a plain attack, and usually cost the
player some thing like, a drain in magical power (MP) or special move power (SMP).
button pulls
up the Special Move Editor. A special move is a specialized attack that a player can use
in a fight. It is usually more powerfull than just a plain attack, and usually cost the
player some thing like, a drain in magical power (MP) or special move power (SMP).
The ![]() button pulls
up the Status Effect Editor. A status effect is a temporary condition applied to the fighter
that will help or hurt in the battle, such as an enemy using a magical sleep spell on the
fighter, that puts the fighter to sleep for a certain number of rounds.
button pulls
up the Status Effect Editor. A status effect is a temporary condition applied to the fighter
that will help or hurt in the battle, such as an enemy using a magical sleep spell on the
fighter, that puts the fighter to sleep for a certain number of rounds.
The ![]() button pulls
up the Font Editor. The font editor is used to create your own fonts for the game.
button pulls
up the Font Editor. The font editor is used to create your own fonts for the game.
The ![]() button pulls
up the Animation Editor. The animation editor is used to create animations composed of
bitmapped images such as GIF images. Most of the time animations are used in battles to
animate special moves or enemies in the battle screen.
button pulls
up the Animation Editor. The animation editor is used to create animations composed of
bitmapped images such as GIF images. Most of the time animations are used in battles to
animate special moves or enemies in the battle screen.
The ![]() button pulls
up the Tileset Manager. This is used to create and modify the tilesets used in your game.
button pulls
up the Tileset Manager. This is used to create and modify the tilesets used in your game.
The ![]() button
allows you to create an installation and setup program for your game.
button
allows you to create an installation and setup program for your game.
To Speed Or Not To Speed?
![]() The Speed
button bar looks like this. Let's take a brief look at each button.
The Speed
button bar looks like this. Let's take a brief look at each button.
The ![]() New Game button
clears all the game information and allows you to start creating a completely new game.
New Game button
clears all the game information and allows you to start creating a completely new game.
The ![]() Open
Project button opens up an existing project or game.
Open
Project button opens up an existing project or game.
The ![]() Save All Files
button saves ALL the files that make up the game.
Save All Files
button saves ALL the files that make up the game.
The ![]() Dock/Undock
Command Buttons button hides or unhides the side button bar.
Dock/Undock
Command Buttons button hides or unhides the side button bar.
The ![]() Dock/Undock
File Browser button hides or unhides the file browsing tree that appears on the right hand
side of the toolkit screen.
Dock/Undock
File Browser button hides or unhides the file browsing tree that appears on the right hand
side of the toolkit screen.
The ![]() Launch
The Bard button opens up a sound player to play sound files with.
Launch
The Bard button opens up a sound player to play sound files with.
The ![]() Configure
button allows you to change background image and button information for the toolkit.
Configure
button allows you to change background image and button information for the toolkit.
The ![]() PakFile
Manager button creates a special packed file with a .tpk extention from all the files in
your game so you can deliver it to an end user all in one file, that can be played using the
tran2.exe game engine program.
PakFile
Manager button creates a special packed file with a .tpk extention from all the files in
your game so you can deliver it to an end user all in one file, that can be played using the
tran2.exe game engine program.
The ![]() Go To
Awesome Computing Website button launches your internet browser and redirects you to
the RPGToolkit Website.
Go To
Awesome Computing Website button launches your internet browser and redirects you to
the RPGToolkit Website.
The ![]() Chat button
used to launch an RPGToolkit Chat room, but it doesn't seem to exist any more.
Chat button
used to launch an RPGToolkit Chat room, but it doesn't seem to exist any more.
The ![]() Test Run Your
Game button does just what it says, runs your game from the toolkit so you can test it.
Test Run Your
Game button does just what it says, runs your game from the toolkit so you can test it.
Now that you have an overview of the toolkit, let's actually do a little playing around with it.
Time To Get Down To Business.
Creating The Very Basic RPG.
Now that we have a basic understanding of the toolkit, let's create the very basic RPG game. The bare essentials required for an RPG game are:
On Your Mark, Get Set.....GO!
First of all if your not already in the toolkit, run it now. If you look at the
speed button bar across the top of the toolkit interface you will see the New Game
button on the left, it looks like this ![]() .
.
Press this button now to start creating your first RPG. This will pop up a new window that
looks like this.
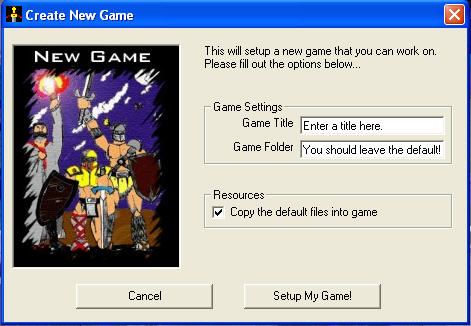 In the
text box next to Game Title enter My First Game, you will see it creating the game
folder name of Game\MyFirstGame, leave this at the default it just created, be sure the
Copy the default files into game check box is checked, and press the button that says
Setup My Game! Once this button is clicked (default graphics, a starting character,
and a starting board are copied into your game directory).
In the
text box next to Game Title enter My First Game, you will see it creating the game
folder name of Game\MyFirstGame, leave this at the default it just created, be sure the
Copy the default files into game check box is checked, and press the button that says
Setup My Game! Once this button is clicked (default graphics, a starting character,
and a starting board are copied into your game directory).
Congratulations student, you just entered the wonderful world of RPG Game programming and have started creating your very first game. The very next window that pops up is the Main Project Editor, this has all the initial setting for your game. The Main Project Editor looks like this.
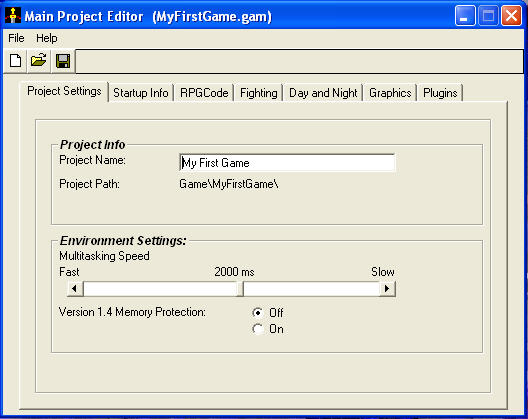 At the top is the title of your game, which you can change at any time. Now click on the
Startup Info tab, the Initial Board File is set to start.brd this is the board your
player will start on when your game starts. The Initial Character File is set to start.tem
this is the file name of the start up character that was created for you. Now click on the
RPGCode tab, notice that a start up program has been created for you called start.prg
this program defines how your title screen will look. We will revisit these programs later
on, for now just leave them alone and close the Main Project Editor.
At the top is the title of your game, which you can change at any time. Now click on the
Startup Info tab, the Initial Board File is set to start.brd this is the board your
player will start on when your game starts. The Initial Character File is set to start.tem
this is the file name of the start up character that was created for you. Now click on the
RPGCode tab, notice that a start up program has been created for you called start.prg
this program defines how your title screen will look. We will revisit these programs later
on, for now just leave them alone and close the Main Project Editor.
Now might be a very good time to press the Save All button ![]() to save the game. It is a very good idea to save your game as you go along to prevent losing
all the work you have done as you go. STUFF HAPPENS!
to save the game. It is a very good idea to save your game as you go along to prevent losing
all the work you have done as you go. STUFF HAPPENS!
Looking Good In The Neighborhood.
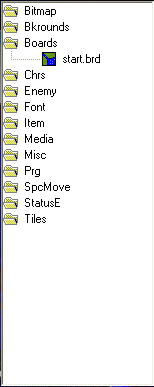 If you look to the right hand side of the main window you will see a grey box, this is the File
Browser, it contains a list of folders. Expand the Boards folder by double clicking on
it. You will notice there is just one file in this folder called start.brd if you will
remember this was the file mentioned as the Initial Start Board in the Main Project Editor.
This will pop up the Board Editor showing you what the Start Board looks like, right now it
should just be a bunch of green grass.
If you look to the right hand side of the main window you will see a grey box, this is the File
Browser, it contains a list of folders. Expand the Boards folder by double clicking on
it. You will notice there is just one file in this folder called start.brd if you will
remember this was the file mentioned as the Initial Start Board in the Main Project Editor.
This will pop up the Board Editor showing you what the Start Board looks like, right now it
should just be a bunch of green grass.
Fun! Fun! Fun! Till Your Daddy Takes Your T-BIRD Away.
YAHOO! now it's time for a little fun, let's run the game and see what it looks like.
Press the ![]() run button. When
the initial screen comes up click on New Game a blue window will pop up that says
"Your story goes here...", when you see this just press the ENTER key to
continue into your game. Your first RPG game should run now and show the grass board we saw
in the board editor, you should be able to move around using the arrow keys. Congratulations!
you have just created the very basics of an RPG game. To exit the game move the mouse cursor
all the way up into the top right corner and an X button should appear, click on this
to exit. Another option is to press the ENTER key, this will bring up the in game menu
where you can click the Exit To Windows button to quit the game.
run button. When
the initial screen comes up click on New Game a blue window will pop up that says
"Your story goes here...", when you see this just press the ENTER key to
continue into your game. Your first RPG game should run now and show the grass board we saw
in the board editor, you should be able to move around using the arrow keys. Congratulations!
you have just created the very basics of an RPG game. To exit the game move the mouse cursor
all the way up into the top right corner and an X button should appear, click on this
to exit. Another option is to press the ENTER key, this will bring up the in game menu
where you can click the Exit To Windows button to quit the game.
So Long And Thanks For All The Fish!
This is the end of the first lecture. It is now time for you to continue on to the assignments and to answer any quiz or survey that I might add to this weeks work.
Good luck!
Ferlin