|
|
|
Written by Ferlin Scarborough
Goal of the lecture
The goal of this lecture is to teach the student the concepts of Game Design. By the end of the lecture the student should have a good grasp of these concepts. We will also start to design our full blown RPG game.
3...2...1...Contact.
If you need to contact me, use either my email at gameprogramming.org or use the course forum. If you have any questions, the course forum is a good place to see if there is anyone who can help you, and you would probably get a faster answer than from me.
The Game Design Process.
A Game Is A Game Is A Game.
The game design process is basically the same regardless of the type of game you are trying to design, there are slight differences for the different types of course. A very common misconception today in most peoples mind is that there is no room in the games development world for the small developer or the "Game Designer Wanna-Be". This is entirely NOT true. With the games development tools available today, even to the low budget folks like me, :) it is possible for almost any one to design and develop a game.
Hey, What's The Big Idea?
There are many debates among game developers as to what the proper process or order you do things in is the best. What I put down in this lecture is just the way I like to do things, you may find an easier way for you. I think the very first thing you need is a game idea, after all with out one, WHAT are you designing?
Don't Forget To Write!
Now that you have an idea for your game the next step is to write down what you know about your game so far. Good old fashioned pen and paper are what some game developers use, but if your lazy like me, a good word processor will do the job. If you write things down as you think about them it will make the game development stage much easier.
Everyone Seems To Be Plotting Against Me!
If you recall from lecture 1 we discussed the 3 basic plots for most RPG games. Each of these plots can contain sub-plots and there are several games out there that combine two or all of these plots into one game. The plot (or back story) will play an important part in your game. I have played games that had some of the most spectacular graphics you have ever seen, but the plot was not very well written. The end result was I never played the games again. On the other hand I have seen games that have a wonderful plot but bad graphics, I have replayed those games just because the plot was written well enough to keep me entertained.
One of the things you want to think about when designing your game is the re-play ability of the game, if the player wants to play the game over again, then they feel like there getting their monies worth.
Don't get me wrong here graphics play a big part in the game as well, in a commercial game you want to have the best graphics you can along with the best plot possible, that will make the game more marketable. A lot of game players rate a game based on graphics and story, as well as play ability (how easy the interface is for the player).
What's In A Design?
Stop Gabbing And Start Designing Teach!
With that said, let me discuss the game design process a little more in detail here. Game Designers have their own little process of how to go about designing their game, many of them will debate the way others do things. I have my own little process that some may disagree with, but then again I'm weird just ask Jonathan Ball. :)
Steps Involved In Game Design.
Time For A Break Down.
Now lets take the previous steps and break them down, so we can get a better understanding of how the game design process works.
Here's A Novel Idea, Write It Down.
First of all we will create what is called a Game Design Document. What is a Game Design Document you ask? A Game Design Document is a document where you take your ideas for the game and put them down on paper. The Game Design Document will guide you later in the programming process. A game design document can be very long, for the purpose of this class we will keep our Game Design Document to the bare minimum required.
What Is In A Game Design Document?
Below is an overview of a Game Design Document.
|
Game Design Document For GameName
Overall Game Design This section is where you describe the elements of the game in more details. This section should include the following:
|
Our Game Design Document?
Bellow is our Game Design Document, the story I compiled from the messages left in the students forum and in various chats.
My Thanks go out to the following people:
|
Game Design Document For Darkness Falls Every 100 years darkness falls over the land of Planetasia. The cause of the darkness is a nearby planet known by the locals as the Devil God Planet. This planet crosses between the sun and Planetasia's home world of Abydos, causing a total eclipse of the sun. Living in the land of Planetasia is a family of fairies who down through the years have used their powers to control the Spirits of the Elements combined with the power of the most powerful fairy, the Fairy Princess (who is one with the land) to push the Devil God Planet back into it's orbit beyond the sun. This has happened since the dawn of time, so the people of the land think of it as just another fact of life, as a matter of fact, they have a big festival and celebration each time. But during the last 100 years, there has been a return to magic in the land. As some of the people grew more powerful with this magic, they became more corrupted by it. This led to the Great Magic War where the wielder of this magic tried to take over the land. As the bitter fight for control raged on, one very powerful Evil Wizard known as Bob of Apophis overtook his rivals and struck fear in the hearts of the common people in the land. Once Bob of Apophis took over the land he demanded that the people bow down and worship him as their God, as long as they bowed down to him, he would protect them with his powerful magic. So, the people all bowed down to the Almighty Bob. Then there was an uprising among some of the people, the Rebels as they were known, decided that the Fairies were the real Gods of the land, since they could control the elements and their Princess was one with the land. These Rebels were cast out by Bob of Apophis into the land to fend for themselves. The Evil Wizard enraged by this Rebel faction used his magic to capture the Spirits of the Elements and imprisoned them in stones, which he then scattered through out the land. Since the Fairy Princess is one with the land, and the Spirits of the Elements are part of that land, the Fairy Princess grows weak with the absence of these Spirits. Once the Fairy Princess is weak Bob of Apophis moves in and takes the Princess as his prisoner. Enter our Hero (Alioth) or Heroine (Lydia), a common peasant, or so he/she thought. Bob of Apophis sensing the latent magical powers in our protagonist cast them out. Our protagonist starts to have disturbing visions of the land dying in complete darkness, when one day a Fairy appears to our protagonist and reveals to them that these visions are prophesies of what is to come if the Spirits of the Elements are not returned along with the Princess to Fairy Land. The Fairy tells our Hero/Heroine that they are the only hope for the land. If the land is plunged into total darkness this will also unleash the Evil Spirits onto the land. Also Bob of Apophis has the Fairy Princess's Magical Scepter which she needs to cast her spell to return light to the land. Game Characters.Alioth (Male) or Lydia (Female) - The Hero or Heroine and Player Character of the game. Bob of Apophis - The Evil Wizard and arch enemy of our Hero/Heroine and their people. Shayla - The Fairy Princess. Various Towns people - People milling about the villages. Various Creatures - Enemies our Hero/Heroine runs into through out the land. Items Used In The Game. EMR Stone - Spirit of Electromagnetisim Stone. Photon Stone - Spirit of Photons Stone. IR Stone - Spirit of Infrared Light Stone. UVR Stone - Spirit Ultraviolet Ray Stone. X-Ray Stone - Spirit of X-Rays Stone. GMR Stone - Spirit of Gamma Rays Stone. Level or Chapter Descriptions. In order to save on space in this lecture we will describe the various locations and Chapter Descriptions as we add them to the game. |
Of course there will be more items and such in the game, but I had to keep it short. You should be able to get an idea of what goes into a Game Design Document from the above.
A Game Design Document for a Commercial Game Company would also include such things as:
For more information on Game Design Documents and Game Design in general you can do a search on the web or visit one of the following sites.
Gamasutra.com - A huge resource for Game Developers.Where In The World?
The next step after the Game Design Document is to draw out a map of your games world. The map can be as simple as a square representing each board with notes inside about that particular board, or the map could be drawing out graphically showing as much detail as you like. At any rate you should draw some kind of map, it will help you to design your boards and link them in the proper places. It will also help you to keep a perspective on how things are layed out.
Dude! This Game Has Character.
After drawing out your game world you should start to drawing out your Player Character(s) and NPC's. What is an NPC exactly? Well an NPC is a Non Player Character, such as people you meet in the villages of your world and your enemies, basically any character or beast that is not a Player Character.
Pssst! What Is The Code Man?
The next thing I usually start doing is coding the game using the RPGToolkit. As a personal preference I usually set up a couple of boards using graphics from the default tileset. Then I come back later and change the graphics to my custom graphics I have created for the game. The reason I do this is so at first I can concentrate on getting some of the programming task out of the way without worrying about getting the graphics right.
These boards that I create at the beginning I usually make very sparse mostly grass and a few blocked items.
After setting up a couple of boards I then go back and start working on the start.prg program to get the Introduction worked out, after all it is one of the first things the player will see. I then add a couple of enemies and a quick fight board like the one I used in the screen shot examples for the first lecture. I add fighting to my second board usually so I can wander around on the first board freely. After I do a little fighting and adjusting of the fighting variables to make things work out the way I think they should in a fight. I then go back and start updating the boards to use my custom graphics, if I created any that is. Each time I make a change to the game I go back and run it again to test the changes I just made, if there are any bugs or problems I work them out and play again, until the game plays without any problems.
Once I have things working the way I want, I then add the rest of the boards I have designed. Also on some occasions the Battle or Fight System included with the RPGToolkit is not exactly what you want, in that case you would design your own Battle System. Which is another lecture further down the road.
Now this next step is one of those that is under considerable debate among game programmers. At what point do you get some one else to play test your game for you? Some programmers prefer to have this done in intervals as they add new areas to the game, others like to wait until they feel the game is about ready to be released to the general public and make it one of the final steps before release. I go along with the crowd that has the game play tested at intervals along the way. After I get a good portion of the game done, where the story is starting to develop and there are a few tasks for the player to be able to accomplish I like to have some one play test my game. I then get feedback from them, this way I have not gone too far into the game to back up and make changes to the game without having to rewrite the thing. I then prefer a final play test before release, to work out any last minute bugs.
As a side note a Play Tester or Play Testers are called Beta Testers in the Game writing community. They play a very important role in the production of your game. By having your game Beta Tested you get an unbiased opinion of your game. It's hard for the creator some times to find fault with his/her creation. While an outsider can look at the game without prejudice. There is an old saying that "You can not have too much play testing done."
Darkness Falls.
That's Nice Teach, But I Wanna Write A Game!
Now that we have covered the very basics of Game Design, let's get on with the job of creating our own game.
Life The Universe And Everything!
Power, Power And More Power!
The greatest power of the RPGToolkit lies in it's built in Programming Language called RPGCode. With this code we can control just about anything in our game.
What A Scary Thought - Programming!
Whoa! Calm down now, DO NOT PANIC! just because I mentioned the words Programming Language. RPGCode is very simple to learn even if you have never programmed before. To me the commands in RPGCode are common sense, meaning that the commands do just what they sound like they do.
In our game that we discussed in the Design Document section we will take advantage of the power of RPGCode. Even though RPGCode has around 150 or so built in commands, you will probably only use very few of them.
Let's Get Down To Basics.
The most basic command in RPGCode is plain text by it's self. When you put text all by it's self in a program it gets displayed in what is called a Message Window. This is a small window that pops up in the game and displays text. If you have ever played any RPG games at all you have seen these window's. Like the message displayed in our first game when we run into the NPC.
Bellow I am going to give a few examples of the RPGCode, if you would like to try these
examples you can press on the ![]() button. To
run the program after you have keyed it in you can press the Run
button. To
run the program after you have keyed it in you can press the Run ![]() button at the top of the Program Editor.
button at the top of the Program Editor.
Here is a sample of a program that puts some stuff in a Message Window.
|
This is text that gets |
If you tried to key in this program and run it, you would see the above text placed inside a Message Window. One word of warning about the Message Window, if it is not filled with text, it will close immediately. I will discuss how to remedy this in the next little section.
Note: Besides the plain text, all RPGCode commands start with the # symbol.
The reason for this is so the computer can tell the difference between text that goes in the Message Window and other commands. In a few minutes I am going to introduce a better way of putting text into a Message Window, along with the reason why it is better.
One of the commands you will use quite often if the #Wait command, this command causes the computer to wait for the user to press a key. So if you want to computer to pause before closing the Message Window, try this program.
|
This is text that gets |
The above program puts the plain text in the Message Window, then waits for the user to press a key (that's what #Wait(a$) does.)
Ok Teach, so that is all fine and dandy, I already know what the #Wait does, it causes the computer to pause and wait for the user to press a key, but what does the a$ do?
The a$ is what is known as a Variable in computer programming speak. A Variable is a way for the computer to store information in it's memory that the programmer can later retrieve by using the Variable name. I like the example that Chris gives in the RPGCode introduction help file. You are a person, right (I hope so)? So how would someone find you in a crowd? Maybe they'd call out your name. So information in the computer is stored in a location of memory that is giving a name by the programmer (or Variable) and when the programmer wants access to that specific information they "Call out its name"
So, now back to the a$, well the #Wait command waits for the user to press a key, then it places the key the user pressed into the Variable a$, which the programmer can then use later on if they want.
One small note on Variables in RPGCode, Variables are not limited to just one letter, they can be longer, we could have said #Wait(Result$) instead and what ever key the user pressed would then be placed in the Variable Result$.
A Better Window Of Oportunity.
I promised you earlier that I would show you a better way to place text in a Message Window and explain the reason why it was better.
First of all using plain text for the Message Window just does not look like a command, it does not start with the #, so some one might mistake it for a comment. Second you can not blend text and variables together without putting them on seperate lines.
You would display a variable by using the #Show command, but this places the
variable on a seperate line, it would not look right to get a message window that looked
like this.
You have
100
Gold Pieces.
A comment is preceded by the * character, any line that has this at the beginning is a comment, and the program ignores this line, it is there just to tell the person looking at the code what is happening. If you write a program then come back months or even years later and look at your code, it would be hard to tell exactly what it is doing, or why you did something the way you did, unless it has comments telling you what you did and why.
So, let me introduce you to the #MWin command, this command stands for believe it or not, Message Window. Variables can be printed in the Message Window by placing <> symbols around the Variable Name in the #MWin command.
Here is an example program showing the elements I just discussed.
|
* The next command is assigning a value to a Variable called myname$. |
The resulting output from running the above program would be a message window that said "Hello, Ferlin Scarborough", then the computer would pause and wait for the user to press a key.
See, you freaked out over nothing. That's how simple RPGCode is. For more information on RPGCode I suggest that you take a few minutes now and press on the Help menu in the RPGToolkit Editor then press on RPGCode Introduction and read this help file. Don't worry it is only 15 or 16 pages long when printed out. It will help you to better understand what we just dicussed along with what will follow as we start working on our RPG Game.
And Away We GO!
Time To Start Our Adventure!
Now before 240+ students hunt me down and strangle me, I guess I better get started on our
RPG Game. So, without further ado start up the RPGToolkit and press the New Game ![]() button. On the Create New Game screen that pops up enter Darkness Falls for the Game
Title, and be sure the Copy the default files into game checkbox is checked. Now click
on the Setup My Game! button. Now just close the Main Project Editor that pops up next
keeping the default settings.
button. On the Create New Game screen that pops up enter Darkness Falls for the Game
Title, and be sure the Copy the default files into game checkbox is checked. Now click
on the Setup My Game! button. Now just close the Main Project Editor that pops up next
keeping the default settings.
In your files browser to the right hand side of the toolkit, click on Board, then double click on start.brd to load your start board.
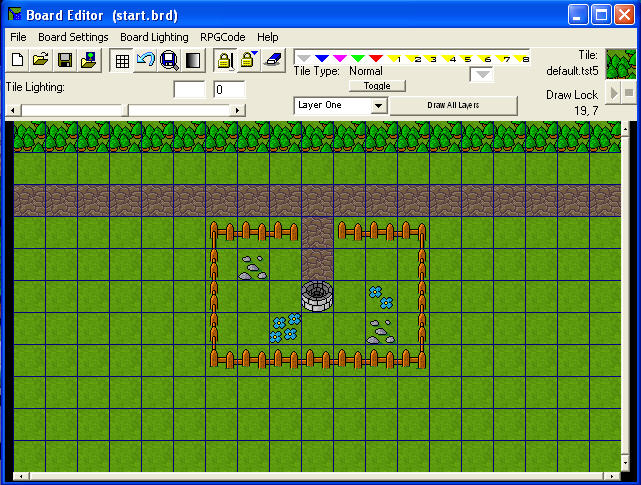 Create a board that looks like this, this is only a test board for now. Click on Board Settings
and Set Player Position and set the Player position to just above the well. Save this board and
then click on File, then New Board and answer Yes to the question about clearing the board.
Create a board that looks like this, this is only a test board for now. Click on Board Settings
and Set Player Position and set the Player position to just above the well. Save this board and
then click on File, then New Board and answer Yes to the question about clearing the board.
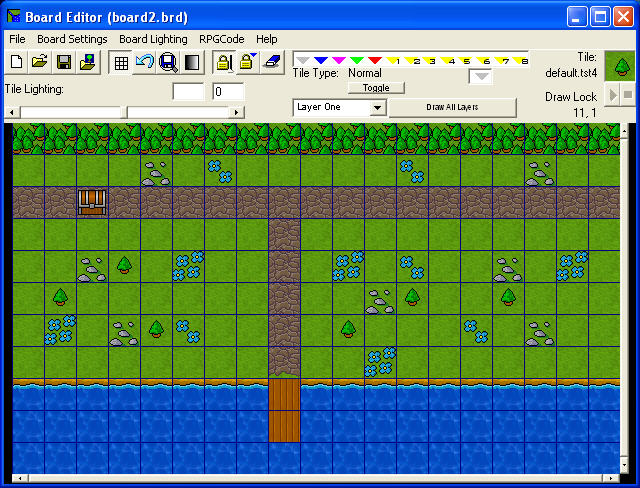 Create a second board that looks like this. Click on Board Settings and Board Information and
set your Eastern Link to start.brd. Save it as board2, now we have a couple of boards
created to wander around on and test a few things. Close the board editor and double click on
the start.brd again, go to Board Settings and Board Information and set your Western Link to
board2.brd
Create a second board that looks like this. Click on Board Settings and Board Information and
set your Eastern Link to start.brd. Save it as board2, now we have a couple of boards
created to wander around on and test a few things. Close the board editor and double click on
the start.brd again, go to Board Settings and Board Information and set your Western Link to
board2.brd
Now exit the Board Editor, this would be a very good point at which to save our progress so
far by pressing the Save All ![]() button. Remember to save often.
button. Remember to save often.
Run the game and be sure you can walk around, and switch between the start board and board2. If not and you have set up the Western and Eastern Links, then most of the time it is a tile marked with the type of blocked on the next board, check your blocked and normal tile types on both boards to be sure you have not blocked a tile you intended to be normal.
Getting Down To The Nitty Gritty.
Let's get down to the nitty gritty now, and do a little programming. Our games start up is very LAME at this point, let's make it look more like a real RPG introduction. For now we will go with the old classic fade in text. Later we will add things like movie like credits to the beginning.
Warning: the following path information given in this lecture assumes you have installed the RPGToolkit into the default directory, you may have to modify the directories if you installed it some where else.
One of the first things I always do is to go to my c:\Program Files\Toolkit2\Game\DarknessFalls\Prg directory and copy the start.prg program to another name like startsave.prg that way if I need to reload the program and start over it is there for me to copy back over. I do this with all my games, just a personal peeve, but you might make it a habit to do the same.
First off be sure to download the following zip files and unzip them to the directories specified here.
Once you have these files into place we are ready to proceede. If you have not read the Introduction To RPGCode help file yet, now would be a good time, it will help you to understand what you are about to see.
By now you should know that the first program run by your RPG Game is the start.prg of course you can change this in the Main File Editor if you like. Bellow is a copy of our start.prg that we will be using in our RPG Game Darkness Falls.
|
******************************************************* |
Since I expect you to read the Introduction To RPGCode Help File, I will not go into each command here, but will touch a little on a few of the commands in the start.prg program.
Most of the commands in the start.prg file can be found in the RPGCode Reference which is available under the Help Menu in the RPGToolkit Editor. If I do not mention a command that you want to know more about, look it up in the Reference Manual, after all if I was to tell you every command, just imagine how much longer this Lecture would be. I learned most of what I know about RPGCode from this Reference Manual and the Introduction To RPGCode Help Files.
Now let's look at some of the commands in the start.prg program. Let's start out in the history() #method. First of all a Method is a way for you to add your own commands to an RPGCode Program. For those of you with a little programming experience you will recognize the #Method command as being what is called in other programming languages a Procedure, Function or Sub Routine.
The history() #Method.
#include("fadetext.prg") The #include command gives you a way to include another programs #methods into the current program. This #include command includes a program called fadetext.prg this program has two #methods in it, one is called AppearText and the other is called VanishText. These two methods will give us the Fading Text effect we want in our Introduction. AppearText - causes the text we send to this command to appear to fade in. The VanishText - causes the text we send to it, to appear to fade out.
Calling All Cars.
When we use a command in our program that we have defined using the #Method command, it is refered to as Calling the command, when a command is Called some times we include what are called Parameters to the command, a Parameter is information that we pass to the command within parenthisis. Each Parameter is seperated by a comma. There are 7 Parameters that we send to the AppearText and VanishText commands, bellow is a list of each of these Parameters and what they are. Your screen is broken down into what is called the X and Y Coordinates, those of you that are Math Gurus will recognize this from graphing. Each character on the screen is placed at an X Coordinate which represents it's position on the screen Horizontally, where the Y Coordinate represents it's position on the screen Vertically.
By combining the RED, GREEN and BLUE values we can set the color of the text, this works just like mixing paints. RED+GREEN=YELLOW just like in grade school. If we set one of these colors at 0 (no saturation) that color will be excluded from the mixture.
The ChoosePlayer() #Method.
I added this command so we could choose the Gender of our Player Character. The #NewPlyr command sets the graphics of the Player Character to a Character Template. The ChoosePlayer Method is pretty straight forward, and all the commands in it are in the RPGCode Reference Manual.
Bellow is a copy of our fadetext.prg for your reference. So, you can see how it works.
|
*Fading text package by Horizon |
Making It All Work.
The RPGCode Programs.
You can either key in the programs showing above (Recommended for learning purposes), or you can use the ones supplied in the RPGProgram.zip file. The RPG Code Editor supplied in the RPGToolkit Editor is just fine for this, personally I prefer to use an external RPGCode Editor calle VORTEX which I downloaded from CY-Tech at http://vortex.cywh.com - Version 3.11 of the Vortex RPG Code Editor.
In order for these programs to work, we will need to make some more changes to our RPG Game. Here are the changes we need to make.
Bring up your start board by double clicking on it under the Boards section on the Files Browser on the right hand side of the RPGToolkit Editor.
Since it is dark in our land we need to make the boards look like darkness. Click on the Board Lighting Menu in the Board Editor and then click on Ambient Effects, there you will see a choice for Darkness, click that then click Ok. Your board should now look the same except for it will be darker over all.
Special Note: The music included in the RPGMedia.zip and the music we are using in our game was supplied by a student Jonathan Ball, with the express condition that it is to be used for THIS GAME ONLY. That is as far as our permission goes with the music. Thank you Jonathan.
Now for a little mood music, click on the Board Settings Menu then on Board Information, on the window that pops up, there is a Music tab, click on this then click Browse and choose the rain.mid file that is included in the RPGMedia.zip file. Then click Ok, then save your board. Now load board2.brd and do the same thing with the lighting and music on it, then save board2.
Gender Bender.
In order for the Player Character to reflect the Gender choosen by the user, we need to have a Male and a Female character. We do this as follows.
Click on the Edit Character ![]() button. In the Character Editor window that pops up change the Character Name field to Alioth
since this will be our Male character we can leave the rest of the character information the same
and RPGToolkit will default to the male character graphics. Now choose File then
Save Character As and save the character as Alioth.
button. In the Character Editor window that pops up change the Character Name field to Alioth
since this will be our Male character we can leave the rest of the character information the same
and RPGToolkit will default to the male character graphics. Now choose File then
Save Character As and save the character as Alioth.
So, what good is a Male without a Female. <GRIN>
Let's create a Female Character. Click on the Edit Character once again to bring up the Character Editor. Change the Character Name field to read Lydia, then click on the Graphcs button.
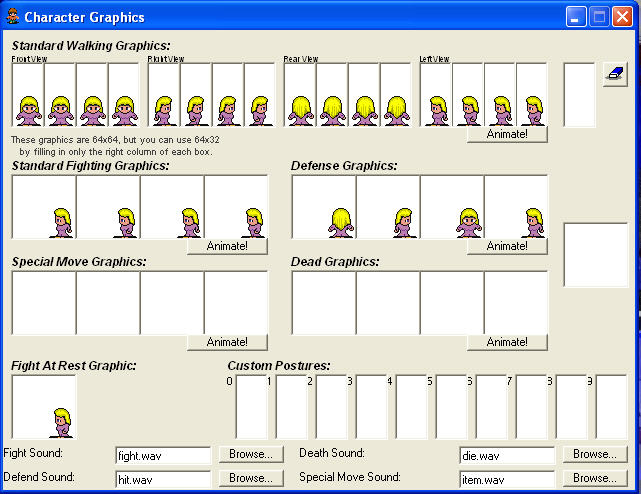 When the Character Graphics screen pops up, change the graphics so they look like this screen
shot. Note that the earaser button in the top right of the window can be clicked in, then by
clicking on the graphic it will be erased, just be sure to click the eraser again to raise it
before placing new graphics.
When the Character Graphics screen pops up, change the graphics so they look like this screen
shot. Note that the earaser button in the top right of the window can be clicked in, then by
clicking on the graphic it will be erased, just be sure to click the eraser again to raise it
before placing new graphics.
Once you get the graphics to look like the picture above, close the Character Graphics window by clicking on the Red X, the choose File then Save Character As and save this character as Lydia.
Do Not forget to save your game. Whew 4 pots of coffee and the sun is coming up outside my window here. Not to mention finger cramps from all this typing, but this finally concludes this lecture.
Please be sure to do any assignments I add to this weeks lecture, and turn them in.
The Restaurant At The END Of The Universe!
This is the end of the second lecture. It is now time for you to continue on to the assignments and to answer any quiz or survey that I might add to this weeks work.
Good luck!
Ferlin