|
|
|
Written by Ferlin Scarborough - Based heavily on Christopher Matthews Help File.
Goal of the lecture
The goal of this lecture is to teach the student how to add Enemies to a game and about fighting in general in RPGs. Also we will discuss adding Items to the game and adding Shops and Inns. WARNING: This lecture contains more images then the earlier ones and therefore will take even longer to load.
3...2...1...Contact.
If you need to contact me, use either my email at gameprogramming.org or use the course forum. If you have any questions, the course forum is a good place to see if there is anyone who can help you, and you would probably get a faster answer than from me.
It Must Be The Warrior In Me?
Now comes the time to discuss battles in RPGs. Most RPG games have fighting in them where the player must battle enemies in order to make it through a certain area, or to build up experience in order to face a stronger foe later in the game.
The way fighting works in most RPGs, is that the player walks around a certain area where the enemy is at, after a short while of walking around the player runs into an enemy, this enemy is usually not seen. When the player encounters an enemy they are whisked off to a special battle screen. This battle screen should look like the current screen the player is on, only zoned in. For instance let's just say there is a camera man filming the player walking around, and then when the player encounters an enemy, the camera man zooms the camera in on the character, so the background is brought closer to the screen. "Ok, Cecil ready for my closeup now".
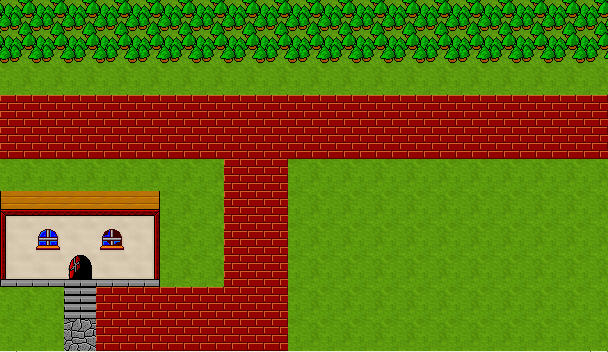
Here is a screen shot of the area the player is walking around in.
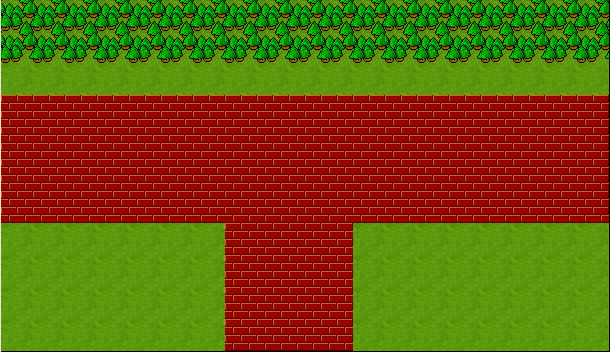
Here is a screen shot of the zoned in battle screen.
These screen shots are just to give you an idea of what I'm trying to say.
Many times in RPGs I see where the battle screen is inconsistent with the area the player is in, say for instance the player is walking through the woods, when a battle starts the battle screen looks like the player is standing inside a temple doing battle. "What's up with that?"
This said I usually make my battle screens consistent with the battle area the player is in at that moment. Earlier in the lecture I mentioned that the enemy is "usually" not seen before the battle screen is brought up. The reason I said "usually" is because there are games and cases where you see the enemy then walk up to them and start fighting, we will be doing this type of thing with our Main Enemy. When we see our Main Enemy we will be taken to a fight sequence. I will show you how this is done, when we get to that point of the game, but basically you have your Main Enemy character on a board, and by using the RPGCode Menu then the Set Program function on that board, you will set an RPGCode program that will control what happens at that point, and will force the battle screen to come up and place you in the combat mode.
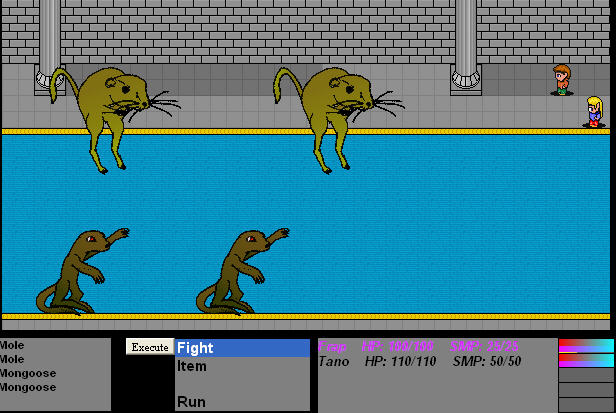
Here is a screen shot of a RPGToolkit Default battle screen, which we will discuss a little more now.
Many of you have probably played around with the toolkit a little bit by this time. In the tutorial you did for the first lecture you added a fighting background screen there. When you ran the game and played it, you most likely (if everything was set up right) entered into a battle at some point in the game.
When the battle screen popped up it looked similar to the one above. The player will be fighting anywhere from 1-4 enemies, this is determined randomly. Which enemies show up on this battle screen depends on the skill level set for the current board, if the skill level is set to say 1, then only enemies with a skill level of 1 will show up for battle in the battle screen.
The Fight Menu.
The fight menu at the bottom of the battle screen is used to control your characters in a fight. Bellow is a list of things that appear on that menu.
The Player Stats.
The player stats to the right shows you the Hit Points (HP) and the Special Move Power (SMP) of each of your players. The red bar shows graphically the player's HP. The blue bar shows the player's SMP, and the yellow bar shows the player's charge time. What exactly is the player's charge time? When a player gets in a fight they must charge up before doing anything. The charge time (or yellow bar) will fill up for each player during the fight. When it reaches the maximum, the player will be able to fight. After the player makes an attack they must re charge before they can attack again. If a player is able to fight, his name will flash, and the command menu (middle one) will be available. Note that the enemies have a charge time also, even though it is not shown on the screen. Fights in the RPGToolkit are what is known as active. This means that the enemies will attack when they are ready instead of waiting for the player to take their turn. This means that you have to be quick when you are fighting, because the enemies are quick also. Note the style of fighting where each enemy takes a turn and the player takes a turn one at a time is known as a Turn Based Battle System. One other type of battle system you will hear about is the Real Time Battle System, in this battle system the enemies and the player all fight at the same time.
The Command Menu.
Once the player is charged up and can fight, the Command Menu becomes available. This menu allows you to choose different thing the player can do:
Depending on the abilities of the player, you may want to do different things. Here is a list of what each command does:
Ending The Fight.
The fight will end when one of the following three things occurs.
When the player wins the fight, they are usually rewarded. Experience and Gold Points GP are given to each of the players who are still alive. Depending on the settings, the player will level-up when the experience reaches a certain level.
Ready Or Not!
Prepare For Battle. (Evil Beware)!
Just like in real life, before you go into battle, if there is any hope of you winning, you need to prepare yourself first. So, how do you prepare a character for battle in the toolkit? We do this in the Character Editor, one of the most important parts of the Character Editor is the character statistics.
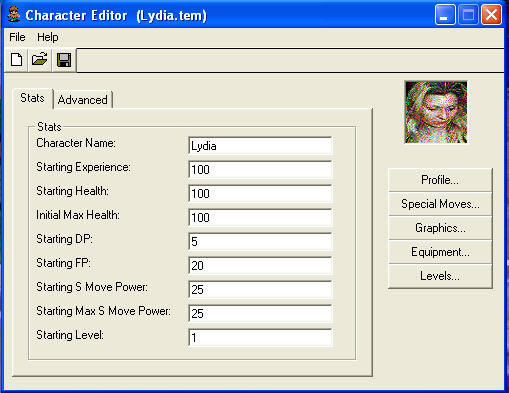
Here is a screen shot of the Character Editor. Now it is time to discuss the information the toolkit uses during battle.
All the fields bellow the Character Name are the initial starting values for the Character. These initial values are the values that the player will have when they first join the game.
The Buttons On The Character Editor.
Let's discuss briefly here the tabs and buttons you see on the Character Editor.
The 'Advanced' tab, will show a bunch of variable names that can be accessed and changed using RPGCode Commands. For more information on this see the RPGCode section in the Table Of Contents (F1) choice in the Help Menu.
The Profile button. If you look at the screen shot of the Character Editor above you will see a picture in the top right of the window that shows Lydia's Face. The profile button will allow you to choose a graphics file for the profile, this graphics file can be a standard tile, BMP, GIF or JPG format. The profile is the image that is shown in the Main Menu when you select the character during the game. In the case of a BMP, GIF or JPG file, it must be 64X64 Pixels in size.
The Special Moves Window.
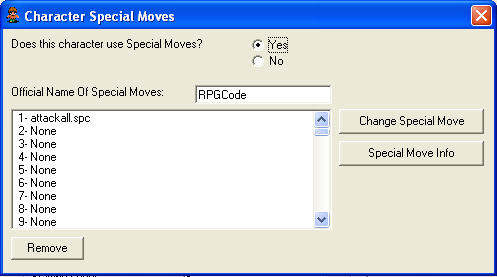
The Special Moves button, will pop up the window shown above. Special Moves are a form of special attack that the player can perform that is usually more powerful than standard attacks. A special move might be a 'magical' style attack. It could also be some special fighting style, like martial arts. The first thing you must do for the player to be able to use special moves is to click on 'Yes' where it says Does this character use special moves? Next, you must give the special moves a name. In the field where it says Official Name Of Special Moves, type in the name of the special moves. This is usually the name of a certain class of special moves (i.e. White Magic, Martial Arts, etc.) This name can be anything you want, but of course it should fit the special abilities of your character.
There is a list with slots for up to 200 special moves. Just click on one of those slots, and hit Change Special Move this will open a dialog box where you can choose a special move file that you create. More on this when we add special moves to our game.
You can set it up so that characters can only do special moves once they have gained enough experience to do so. You do this by clicking on the special move slot that you wish to edit, then hit the Special Move Info button.
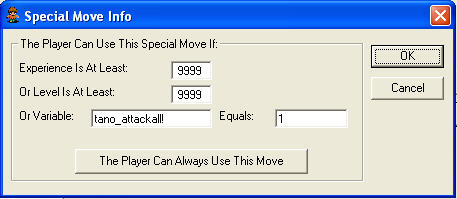
When you press the Special Move Info button it will pop up a dialog box that looks like this.
In this new window, you can set the conditions under which the character can use this move. For example, let's say you had a character that could use fire, but could only use it if their experience was at least 800. Well, if you put 800 in the Experience Is At Least: field, then that's how it will work.
Important Note: You can set a minimum experience, but the three conditions on this dialog still have to be set. For example, you could set the minimum experience to be 800, but if the minimum level is still zero, then the player will still do this move, since his level will always be higher than zero. Make sure you set the other values to impossibly high amounts, so that only the condition you want met is used to determine if the player does this move or not. In the case of the screen shot above a condition is used based on the value of a variable, so the other two fields are set to real high values (9999). The variable condition is a way to add a move to a player through RPGCode.
The Character Graphics Window.
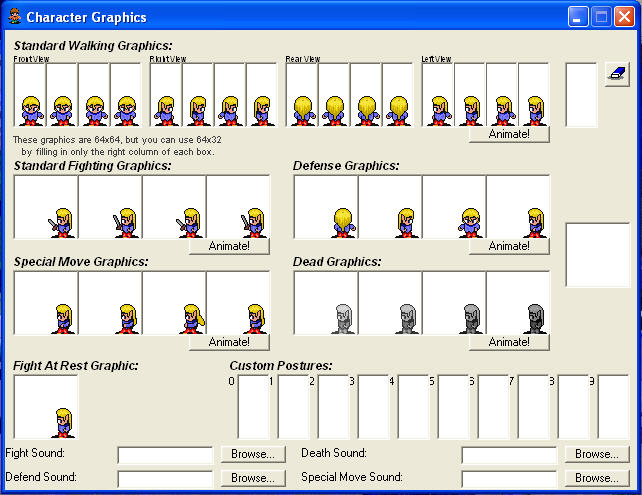
The Graphics button, will pop up the window shown above. Setting up the character graphics can be a time consuming operation, at the very basic level, you must draw at least 16 graphics just for the basic character animation.
Let's discuss each section on the Character Graphics window. We have already done some work in these areas in setting up our Lydia Character, but since we are talking about fighting we need to discuss them any way.
Under the heading of Standard Walking Graphics: there are 4 sets of 4 boxes. These are the boxes for the 16 graphics I mentioned for the very basic level. Each of these boxes represents a frame of animation in the character's walking graphics. Each set of 4 boxes represents the animation for the character walking in each direction, South, East, North and West. Each frame or box, is 64X32 pixels in size (that's two tiles stacked on top of each other). So if you want to create a tall character then you would compose the character graphics of two tiles each.
The first set of 4 boxes is the Front View, this is the view the player has when the character is walking South toward the player. When inserting the graphics for the character you should click on the bottom part of the box, unless you are using two tiles per frame. The second set of 4 boxes is the Right View, this is the view the player has when the character is walking East or facing right. The third set of 4 boxes is for the Rear View, this is the view the player has when the character is walking North or away from the player (the back view). The last set of 4 boxes is the Left View, this is the view the player has when the character is walking West or facing left.
Once you have these 16 graphics inserted you can press the Animate! button to see what the character looks like when in motion. As a side note, when creating the graphics for the character, once you get a set of graphics for one direction, such as the left view you can use the flip tool in the Tile Editor to flip the graphics, this will save you time since you will not have to redraw the character facing the opposite direction.
The next row of graphics starts out with a set of 4 boxes with the heading of Standard Fighting Graphics: this set of boxes are 64x64 pixels in size. When using the standard 32x32 graphics click on the lower right part of the box to insert the graphics. The fighting graphics should show some thing like the player swinging a sword.
The next set of 4 boxes on the second row with a heading of Defense Graphics: is used for the graphics of the player defending themselves in a fight when they get hit.
The third row consists of two set of 4 boxes also 64X64 pixels in size. The first set of 4 boxes under the heading of Special Move Graphics: is for the graphics shown when the player performs a Special Move.
The next set of 4 boxes on the third row are under the heading of Dead Graphics: this set of graphics is what is shown when the character is dead, for instance when you have a party with several characters in it, and one of them is killed in a fight, these graphics will be used to show the person as dead.
The fourth row of graphics consists of 1 box of 64x64 pixels size and 10 boxes of 64x32 pixels size. The first box of 64x64 pixels has the heading of Fight At Rest Graphics: and is used to represent the player when they are idle during a fight. (No it does not mean when the character is asleep, so the player laying in a bed probably would not work here).
The next set of graphics on the fourth row consists of 10 boxes with the heading of Custom Postures: is a way for you to create the player doing other things, such as nodding their head or picking their nose or what ever you want. These frames can be accessed using RPGCode to create custom actions.
Finally at the bottom of the Character Graphics is a place for you to specify the sounds used during a fight in the game. Here you can specify a WAV file to be played when the character swings their sword, gets hit, dies or uses a Special Move.
The Equipment... button.
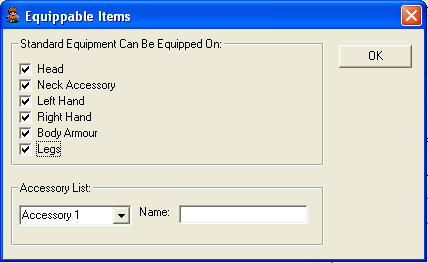
The Equipment button, will pop up the window shown above. This window will allow you to specify what body locations you can equip items on. In a fight, a character can wear certain equipment that will improve their fighting and defensive ability. Common sense will tell you that a player wearing armor should sustain less damage than a player who is wearing a leather coat. This window is pretty simple to use, just check a body part that you want to equip with items. For instance if you want the player to be able to wear a helmet, then be sure the Head is checked. At the bottom of this window is an Accessory List. This allows you to add body parts that are not listed here. For example if you had a magic ring that you wanted the player to wear, you would add 'Ring Finger' to the list to allow the player to equip a ring. You can specify up to 10 accessory body parts.
The last button on the Character Editor is the Levels... button.
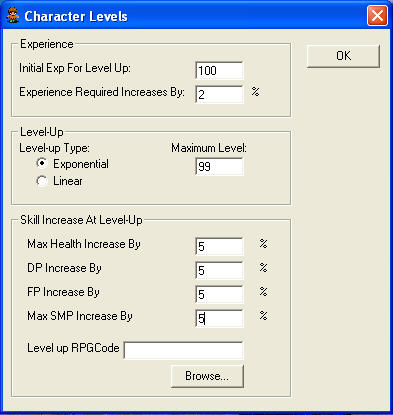
The Levels button, will pop up the window shown above. When the players experience increases it only makes sense to reward the player with increases in health and fighting power. When the player reaches a new Level of development their HP, DP, FP and SMP increase.
Under the heading of Experience you will see a field titled Initial Exp For Level Up. This is the amount of experience the player must gain to move on to the next level. If the player starts off at level 1, a good value for this is 100. This means that the player will have to gain 100 experience points before moving on to level 2.
Next, is the Experience Required Increases By field. As the game progresses each enemy should give progressively more experience (because they are more difficult). The value you specify here is the percentage by which the required experience increases from one level to the next. Let me explain how this works, if you set this value at 10%, and the initial increase value is set at 100, then once the character has made it to level 2, the experience required to get to level 3 will be 110 points (100 X 10% = 10). Then the experience required to get to level 4 would be 121 points (110 X 10% = 11), and so on. A value of 10 is good for this field. The default of 2% causes the levels to progress very quickly using the above example with 2% would mean that to get from level 2 to level 3 would require an additional 2 points or 102 experience points, to get to level 4 would require 104 points, see how fast that would be? Depending on the length of your game, the higher this value the longer your game would take to play, because it would take the character longer to reach higher levels.
Next is the Maximum Level: field, this allows you to set the maximum level the character can increase to. Without a maximum level the character could increase to a level where they would be invincible. A value of 99 is used by most RPG games.
Under the final heading of Skill Increase At Level-Up are the fields that allow you to set the percentage by which the characters HP, DP, FP and SMP increases by when a character reaches a next level. A value of 10 is good for this.
Caution: Make sure this percentage is high enough to actually make a difference. For instance, if the character has an HP value of 60, and it was set to increase by only 1% when the level increases. 1% of 60 is 0.6 points, which the toolkit would round down to 0 points, so, the character's health would NEVER increase. If the value is set to 10% on the other hand, then the player would go from 60 to 66 HP (10% of 60 is 6 points). That sounds much more like what you would want, don't you think?
Finally the last field is the Level up RPGCode field, here you can specify an RPGCode program to run when the character levels-up. You have seen this type of thing in other RPGs when the level increases after a fight, a message pops-up saying the character has gained a level, or some thing along those lines.
I'm Just In It For The Fight!
Meet your enemy!
Now we have gone through all that to prepare our character for a big battle, but what have we prepared our character to meet? Time to discuss the characters worst nightmare....the enemy.
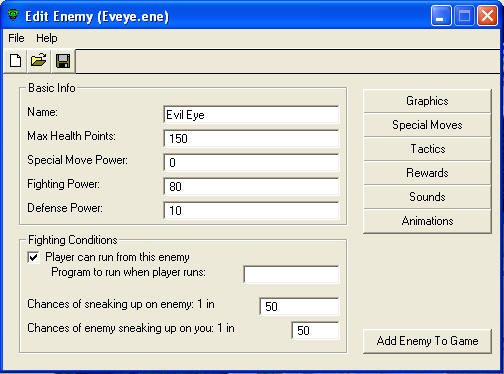
Here is a screen shot of the Enemy Editor.
Enemies can be very diverse in the Toolkit. They can range from a wimpy little rat to a madman with the power to destroy the planet. And size doesn't matter. Why not give the rat the ability to destroy the planet? The player would probably not see that one coming!
Creating an enemy is very similar to creating a character. The only difference is that you do not need to worry with level progression. What this means is that even though you may encounter the same type of enemy many different times, they never any more powerful, like your characters do. The issue of enemy strength is dealt with as your player moves from one location to another. At first the player should encounter fairly easy or weaker enemies, as the player moves out into the world, the enemies should get more powerful. In the final cave, dungeon, castle, palace or what ever, the player should not encounter weak enemies from the start of the game. When the player moves to a new area, the old enemies stay in the old areas. So, the player is alway encountering new enemies, which makes the game much more interesting. Of course this means we have to create lots of enemies, and that is what we use the Enemy Editor for.
In the Basic Info section you enter the enemy's Name, HP, SMP, FP and DP, just like in the Character Editor. Since an enemy is entirely automated by the computer, the system takes care of these values for you, so once you enter them you will not need to worry about them any more.
In the Fighting Conditions section, you can specify options to define how a fight will occur. The Player can run from this enemy check box, tells the Toolkit rather the player can run from this enemy during a battle. You can also specify an RPGCode program to be run when the runs away, in the Program to run when the player runs: field. This is useful depending on the strength of your enemy. If your enemy is the Boss, you probably should not allow the player to run away from it.
The next two fields, the Chances of sneaking up on enemy: 1 in, and the Chances of enemy sneaking up on you: 1 in define how accurate the enemy's and player's hits are. The odds that you enter here tells the Toolkit what the chances are of a critical hit occurring are. A critical hit is a hit that is not affected by the targets defense power (in other words, a critical hit to a character wearing armor, would be like a hit on a character that was not wearing any armor, thus increasing the hit power significantly.
Time to discuss the buttons on the Enemy Editor.
The Graphics Button.
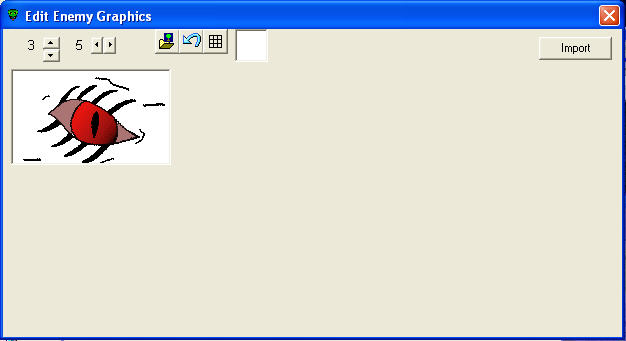
The Graphics button, will pop up the window shown above. This window will allow you to add the enemy graphics, this editor is very similar to the Board Editor, except you can resize the enemy up to 19X7 tiles. You can construct the enemy from tiles, but a better option is to import a bitmap, Gif or Jpg image for the enemy graphic, you can accomplish this by pressing the Import button. A new screen will pop-up. Here you can click on ' Open Graphic' to open the graphic you wish to import. You should also click on ' Get Transparent Color' and click on an area of the graphic that should be transparent when the graphic is imported. Finally just click on 'Import Graphic'.
You will be asked to choose a filename to save the converted tiles into. This is a tileset (in .tst) format. You can make a tileset called for instance enemy.tst, and save all your enemy tiles into it, if you want. After this is done you will be returned to the enemy graphic editor. Hit 'redraw' and resize the image as necessary, now you have an enemy.
The Enemy Special Moves button.
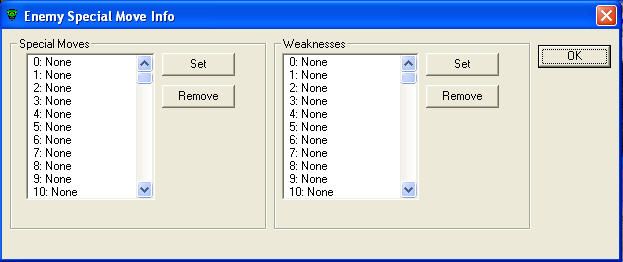
The Special Moves button, will pop up the window shown above. Just like characters, enemies can do special moves. However, enemies also have weaknesses to certain special moves that the characters can do. Say for instance the enemy is a Snowman (did that for you Kathi), and the character has a Fire special move, it only makes sense that the Snowman would take more damage from the Fire.
The enemy special moves window has two lists in it. The enemy can do up to 101 special moves and have up to 101 weaknesses. To add a special move that the enemy can perform, just click on an empty slot then click on 'Set'. This will open a new window that will let you choose a special move to add. The weaknesses works the same way.
Note: the enemy will consume SMP each time it uses a special move, so be sure to give it enough SMP to perform special moves in the first place. An enemy will take more damage if hit with a move it is weak against.
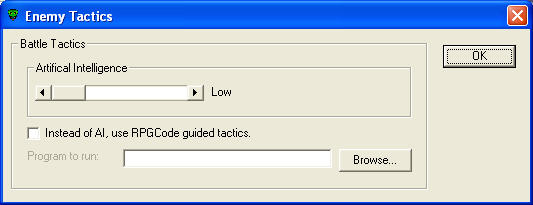
The Enemy Tactics button.
The Tactics button, will pop up the window shown above. Since an enemy is directed by the computer, it uses the Toolkit's internal artificial intelligence system (AI) to determine what to do in a fight. The level of intelligence that the enemy has can be set in this window by sliding the slider bar. There are four preset intelligence levels available:
Usually one of these AI levels will be sufficient for an enemy, but some times you may wish to have an enemy act exactly as you want it to. This can be done through the use of an RPGCode program. If you wish the enemy to use an RPGCode program you can check the checkbox that is labeled Instead of AI, use RPGCode guided tactics. then click the Browse... button and choose a program to use.
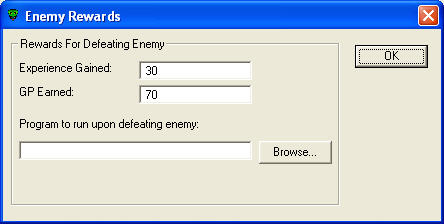
The Enemy Rewards button.
The Rewards button, will pop up the window shown above. Why fight in the first place if there is no reward for it? To reward the player for winning a fight you usually give them experience points and gold. In the Experienced Gained: field tells how many experience points is added to the character for each enemy defeated, the GP Earned: field works the same way only it gives this many Gold Pieces to the character for each enemy defeated. Finally you can specify an RPGCode program to run once this enemy is defeated.
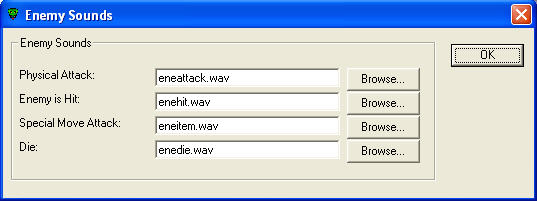
The Enemy Sounds button.
The Sounds button, will pop up the window shown above. What good is an enemy unless it makes sounds when it attacks, defends, performs a special move or dies? You can modify the .wav sounds that are played when the enemy does certain action using this window.
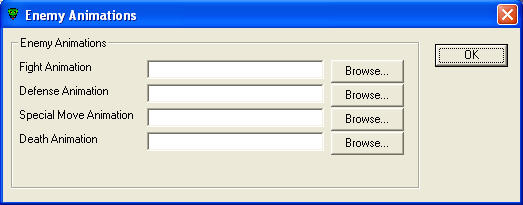
The Enemy Animations button.
The Animations button, will pop up the window shown above. When an enemy attacks or is hit by the player, you can have an animation run. These animations are created using the Animation Editor (Covered in the a section a little further down). This window will allow you to set the animation for the enemy attacking, being hit by the player, performing a special move and dying.
The Add Enemy To Game button.
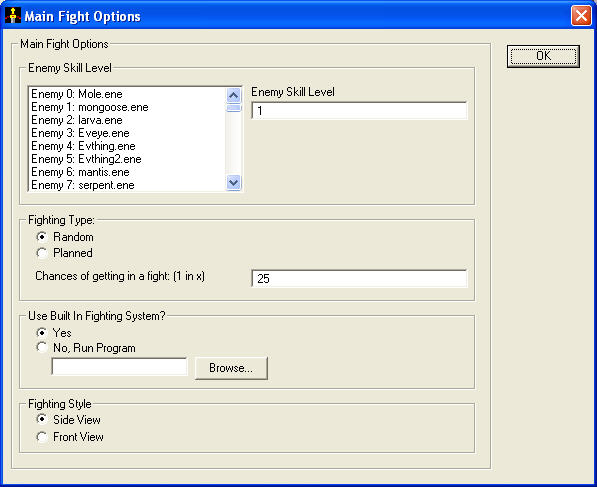
Finally the Add Enemy To Game button, will pop up the window shown above. You will be asked to save the enemy before this window pops up. Do you remember on the board editor when you set the fight options for your board from the tutorial? When you turned fighting on for the board you had to set the skill level of the board. Well, when a player gets in a fight on any board, they will fight against enemies of the same skill level as the board. That skill level for the enemy is set here, first you choose an enemy by double clicking on it's name in the list in this window, then in the field to the right of this list, you set that enemies skill level.
The next thing you see in this window is the fighting type, you have two types to choose from here Random and Planned.
The next section is Use Built In Fighting System? In this section you decide rather to use the internal fighting system or not. If you set this to 'Yes', then all fights will be handled through the Toolkit's internal fighting system. This is a very functional fighting system and is sufficient for most gaming uses.
If you find that you prefer a different style of fighting system than the internal one, you can write your own Battle System in RPGCode. If you do this, then set the fight system to No, Run Program, and click on the box to choose a filename.
NOTE: It is very difficult to create your own Battle System in RPGCode, and the Toolkit was designed to use the internal system. If time permits however we will discuss creating our own Battle System in a future lecture.
If you choose to use the internal fighting system, then the last section is where you choose the style of the fighting system, you have two styles to choose from. Side View and Front View, the side view is the traditional setting, where the fight is viewed by the player from the side. The front view has the player facing the enemy or in front of the enemy. The best thing to do is to try both of these modes then choose the one that best fits you.
Annnnnddddddd Action!
Time for some animation.
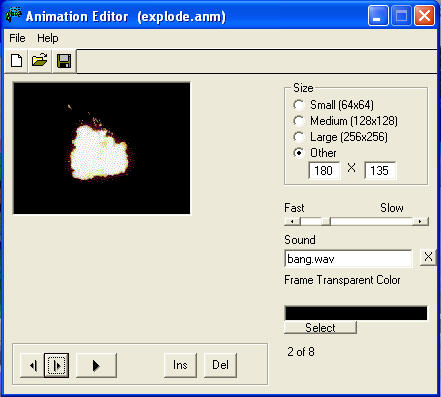
Here is a screen shot of the Animation Editor.
As I promised above we will now discuss the Animation Editor. You can create animations composed of bitmapped images, such as GIF images to use in your game. Mostly, animations are used in battles to accompany Special Moves or to animate enemies.
You can open the Animation Editor by pressing the Edit Animation ![]() button on the main RPGToolkit Editor screen.
button on the main RPGToolkit Editor screen.
You can set an image to a frame of animation by clicking on the black box. The images are sized according to the specified size of the animation. You can set the size by adjusting the size attributes to the right. Each frame of animation can have its own sound effect. This allows your animation to be accompanied with sounds (like an explosion sound for an explosion animation). You can add a sound file for each frame by clicking in the sound box.
Each frame of animation should have a transparent color. This is a color in the image that will be ignored, and used as transparent. A distinctive color is usually the best choice (like a bright green, for instance). To set the transparent color for a frame, hit the 'Select' button and then click a spot on the image where that transparent color is.
What Effect Did It Have On You?
Fight Status Effects.
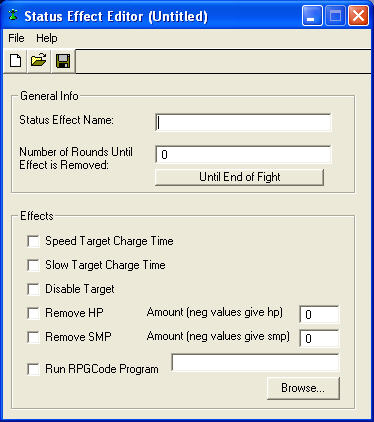
The Status Effect Editor window.
The Status Effect ![]() button, pops up the window shown above.
button, pops up the window shown above.
During a battle, a character or an enemy can be affected by a status effect. This is a temporary condition applied to the fighter that will help or hurt in the battle.
The General Info section. The basics of the status effect are the Name and the number of rounds in the fight this effect will last. A single round includes a chance for all players and enemies to make one move. If the effect is only to last one round, then it will only affect the fighter once while the fighter is making a move. If you set this value to 0, the effect will last during the entire fight. All status effects are removed at the end of a fight.
The Effects section. The effects section of the screen allows you to define exactly what the status effect does. These are the options available:
Am I Allowed To Fight?
Enabling Fighting In The Game.
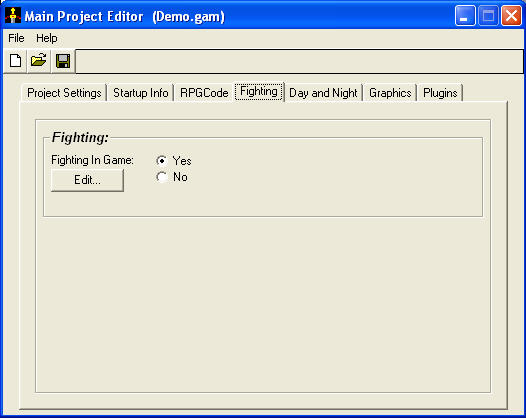
Main File Editor Fighting tab.
In the Fighting tab, you have the option to turn fighting on or off for the game. If you turn it on, you must edit the fight settings. Clicking on the Edit button does this. This will open the Main Fight Options window shown earlier during the add enemy to game area.
Board Stiff!
Enabling Fighting On A Board.
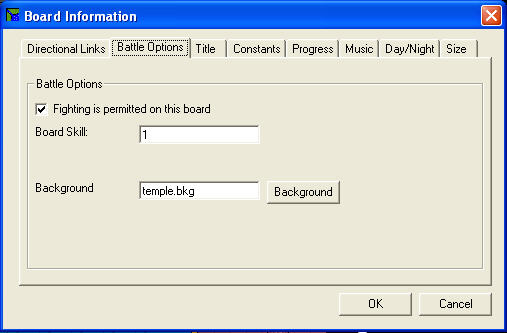
The Battle Options under the Board Settings.
In order to enable fighting in certain areas of your game, you must tell the Toolkit that fighting is allowed in a particular area, you do this under the Board Editor. By clicking on the Board Setting menu then click on the Board Information choice. The above window will then pop up. This window will allow you to specify rather or not fighting is permitted on this board. For some board, you may wish to have players never get in a fight (like in a town), but for others (a cave) the possibility of fighting should be open. If you want fights to be allowed, specify this by clicking the check box next to Fighting is permitted on this board. If fighting is permitted then there are two other things you must fill in. First is a Skill Level in the field marked Board Skill: this is a number that you specify it can contain any number you want. The way this works is, if you set the Board Skill to 1, then the player can ONLY fight enemies who are defined to be of skill level 1.
At the first of the game, you will want simple enemies, but by the end, the enemies should be more difficult. Adjusting the skill level allows you to control this. The other thing that you have to fill out is the Board Background File. This is the filename of a background file (*.bkg) over which the fight will take place, this was covered earlier in the lecture. You specify this in the Background field.
What Next?
So, Have I Totally Blown Your Mind Yet?
This is a lot of information to grasp at one time I know. I had originally intended for this lecture to also cover Items, Shops and Inns. But due to the overwhelming amount of information presented so far in this lecture, I decided to save those for the next one. In the next lecture we will start to add enemies and fighting to our game Darkness Falls. We will also cover the Board Editor in more detail, including the Tile Types.
Note due to time limitations and the amount of information in this lecture there will NOT be any assignments accompanying this lecture.
Ta Ta For Now Students!
This is the end of the third lecture. It is now time for you to continue on to the assignments and to answer any quiz or survey that I might add to this weeks work.
Good luck!
Ferlin