|
|
|
Written by Ferlin Scarborough.
Goal of the lecture
The goal of this lecture is to teach the student how to add Enemies and Fighting to
their RPG Game. This will include battle music, sounds and animations.
WARNING: This lecture contains a lot of images and therefore may take longer to load.
Getting In Contact With The Teacher.
If you need to contact me, use either my email at gameprogramming.org or use the course forum. If you have any questions, the course forum is a good place to see if there is anyone who can help you, and you would probably get a faster answer than from me.
Go Ahead Mr. Baddie ...... Make My Day!
Enemies Ahead!
So, was the last lecture a little too much to comprehend at once? Most of the information in lecture 3 was from the Help file included with the Toolkit, so if you need further explanations then read the help file.
I know what you are thinking after reading that lecture, " YAK! YAK! YAK! BLAH! BLAH! BLAH! ". Well that was my version of the novel War And Peace. :) So, you say you are ready to quite talking about fighting and get down to implementing it in our game? There is an old saying " No time better than the present ".
Without Further Ado, Let's Get Down To Business.
There are quite a few resource files available for this lecture, so now would be a very good time to download those and install them, below is a list of the resource files and where they need to be installed (Unziped).
The path names listed below assumes that you installed the Toolkit into its default directory, if not you will have to modify these paths to suit your needs.
Let's get started with our changes to Darkness Falls. Of course it would be a good idea about now to start up the RPGTookit, and load your Darkness Falls game.
First we are going to need a fighting background, so click on the Edit Background
![]() Button, and create
the following Background.
Button, and create
the following Background.
Note: The tombstone and the newly dug grave tiles are in the DarknessFalls.tst tileset included in the above resource files.
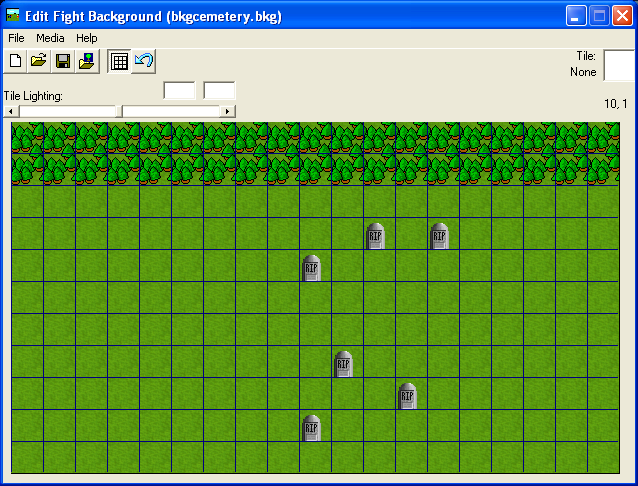
After you have laid down the tiles to build the background shown above, click on the Media Menu, then click on Background Music, in the window that pops-up, set the field under the heading of Background Fight Music to DryBones.mid.
Now that you have finished building this background save it as bkgcemetery
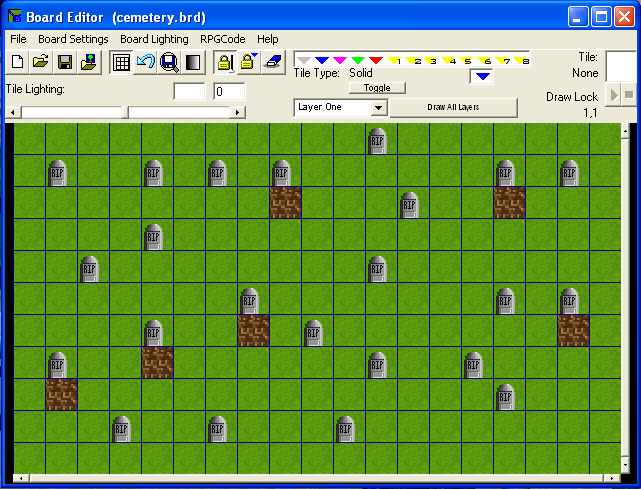
Next let's add another board that looks like the following:
This would be a good place to discuss board layers and tile types. The RPGToolkit allows you to have up to 8 board layers. A board is not just a flat surface, it has up to 8 layers of height, making it more 3 dimensional. Rather than go into layers here, I think the Help File explains this fairly clearly, so if you are interested in known more about layers then refer to the Layering section of the Help File, under the Edit Board heading. Layering can be a very useful feature of the Board Editor, I mention it here because of the Tile Types I am about to discuss.
What are Tile Types? Well, once you create a board you have to have a way of telling the Toolkit that the character can not walk on certain parts of this board, such as a building or walls, or water (unless of course your character happens to be Jesus). :)
You do this by setting Tile Types. Notice that along the top of the Board Editor there is
a row of colored triangles that looks like this
![]() . You may also notice
that right below ( <- for you David R.) that is a label that says some thing like Tile
Type: Solid, this tells you what the current Tile Type is, so any tiles you lay on the
board will have this tile type, in this case Solid. Right below that is a button
labeled Toggle this button will change the current Tile Type, so you can toggle between
say Normal and Solid as you lay down each tile. You can also click on the colored triangle
that represents the specific Tile Type you want to set it. Kind of clumsy don't you
think?
. You may also notice
that right below ( <- for you David R.) that is a label that says some thing like Tile
Type: Solid, this tells you what the current Tile Type is, so any tiles you lay on the
board will have this tile type, in this case Solid. Right below that is a button
labeled Toggle this button will change the current Tile Type, so you can toggle between
say Normal and Solid as you lay down each tile. You can also click on the colored triangle
that represents the specific Tile Type you want to set it. Kind of clumsy don't you
think?
Here is a list of each Tile Type and what it does.
There is a much faster and easier way to handle Tile Types, here is what I usually do, and
man I'm LAZY and will take the easy way any time I can. I set the tile type to the Grey Triangle
which is Normal, I then lay down ALL my tiles using that type. At the top of the Board Editor
there is a row of small buttons among them is the Draw Lock
![]() button and the
Tile Type Lock
button and the
Tile Type Lock ![]() button.
button.
If you press the Draw Lock button this puts you in the regular Drawing Mode, each tile you lay in this mode will be of the Tile Type you currently have selected, and where you press on the board, that tile will be replaced by the current tile graphic you have selected from your Tile Set.
Once you get the tiles laid down you can then press on the Tile Type Lock button, the one that looks like a pad lock with a blue triangle on it. This will allow you to change the Tile Type without changing the graphics. When you go into the Tile Type Lock mode, each tile will have a triangle on top of it with the Tile Type represented by the color of triangle shown above. To change a Tiles Type, just click on the type you want then click on that tile, another feature is if you click and hold the mouse button down and move it across a row or group of tiles, each one the mouse pointer crosses over will be changed to the currently selected Tile Type.
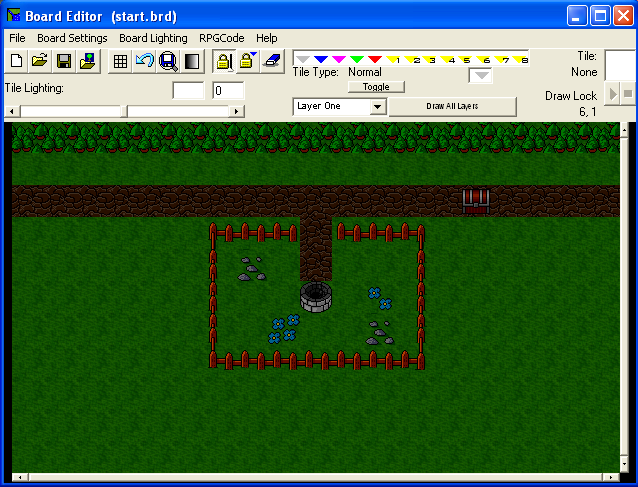
Now, set the Tile Types on your cemetery board like the screen shot below.
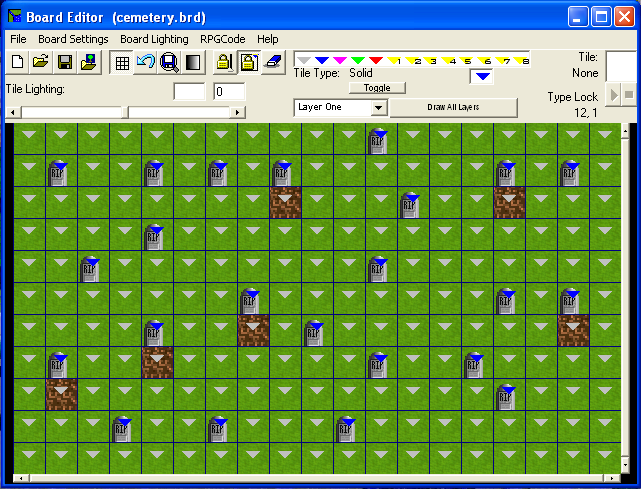
Now save this board with the name cemetery.
Now click on Board Settings, then on Board Information. You should see the Board Information window pop-up, if you choose the Battle Options tab, then your window should look like the one pictured below.
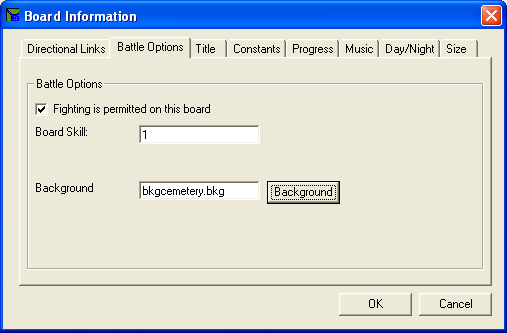
Now set the fields in this window just like the ones in the above picture. Be sure the Fighting is permitted on this board check box is checked.
Click on the Music tab.
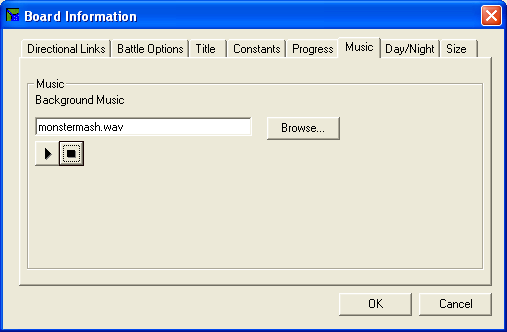
Set the Background Music field to monstermash.wav as shown above.
Now click on the Directional Links tab and set the field titled Eastern Link to start.brd, then click the OK button, then save the board again.
Next click on the Board Lighting Menu then choose Ambient Effects, and click on the Darkness choice. After all we are in a land of eternal darkness right now. Note: I received a number of the second assignment, that this was not done on the 2 boards.
Finally load the start.brd into the Board Editor and change the Western Link to cemetery.brd, this time I'm going to play Mean Old Teacher and make you figure out how to do this on your own. :)
If you would like, to cut down on clutter, you can delete the board2.brd from the Boards sub-directory of your game.
Lights, Camera, Action!
A Little Side Note.
Now let's take a break from the boards for a while and have a little fun, what do you say?
|
While I'm thinking about it, and as a side note here, let me tell you a little trick that I like to use. I have created a new game called Test. This game consists only of three boards. A start.brd, a board2.brd and a house.brd with a western-eastern link set up between the start.brd and board2.brd. On the start.brd I have created an npc that I like to play around with, I also placed a house on there with an open door. On board2.brd I have just placed a few blocked tiles of trees. I use this test game to play around with things to get them to work, then I load my real game and add the changes to it. That way if I screw things up, I do not mess up my real game. You might consider some thing like this as you progress with your game making. The house board just has some sparse furnishings and that's about it, I use that board for testing indoor type things, I get to and leave that board using a Warp Tile, which we will cover a little later on. It may help you to do some of these things in a test game first to figure them out, then add them to Darkness Falls, that's what good old Teach here did. |
Animate Me Baby!
The fights we have been getting into in the first assignment, after following the tutorial, kind of strike me as a little boring. Maybe we should try and add a little action to our fights in Darkness Falls. We will do that by adding some animation to the enemy, that way they don't just stand there the whole time.
I jumped on Reiner's Web Site and downloaded a skeleton that we could use for an enemy in our cemetery (Fitting don't you think)? Reiner's Web Site is located at http://www.reinerstileset.4players.de:1059/englisch.htm he does a great job with creating tilesets, he uses a program called Multi Media Fusion for writing his games, so if you get tilesets or graphics get the ones he has available in the .bmp format.
We will add the animation using the Animation Editor, press the Edit Animation
![]() button.
button.
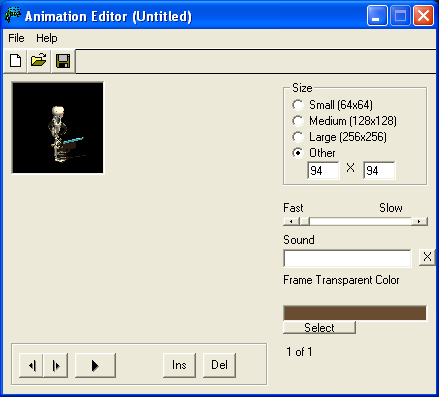
Once you press this button the Animation Editor will pop-up, the Animation Editor looks like the screen shot above.
Now that you have the Animation Editor open, let's start adding some actions for the enemies. If you will notice there is a frame in the window with the title of Size, within this frame are four choices for the size of the animation. Click on the one that is labeled Other, then in the fields below that type in 94 for both of them. This tells the Animation Editor that our animation will be 94X94 pixels in size for each frame.
Next we will start to build the animation. At this point if you have not done so yet, then you need to download the resource files for lecture 4 from gameprogramming.org, and install them as noted earlier in the lecture. If you click on the black box in the upper left of the Animation Editor window, this will open a file dialog window that will allow you to choose the graphic file to place in the 1st frame of our animation. This file dialog window should be defaulted to the Bitmap directory for our game if not navigate to that directory (the one you installed the graphics zip file into). There is a file there named SkelAttacke01.bmp, click on this file and it will appear in the black box in the Animation Editor. Next we need to select the transparent color for our animation, the transparent color is the color the Toolkit will make invisible so our background the animation is played on will show through. In order to select the transparent color press the button labeled Select, that is located near the bottom right of the Animation Editor. Once you press the select button an information message will pop-up just click OK then click on the background a reddish brown color in the picture for our frame. This should turn everything in the picture of this color black, your Animation Editor should now look like the exactly like the one pictured above.
NOTE: If you fail to select the transparent color on the first frame, and happen to think of it later, you will have to select the transparent color for every frame you add. But if you select it on the first frame it will remember it for the rest of them.
Now that we have the procedure down on how to add a frame we will go on to adding the
rest of the frames to our animation. Press the Next Frame
![]() button now, the
second button from the left near the bottom of the Animation Editor, it looks like a vertical
line with a triangle pointing to the right after it. The button before that is the
Previous Frame button, and the one after it the big triangle pointing to the right is the
Play Animation button. If you miss a frame when adding the graphics for your animation
you can press the Ins or Insert button, likewise if you add one twice you can press the
Del or delete button.
button now, the
second button from the left near the bottom of the Animation Editor, it looks like a vertical
line with a triangle pointing to the right after it. The button before that is the
Previous Frame button, and the one after it the big triangle pointing to the right is the
Play Animation button. If you miss a frame when adding the graphics for your animation
you can press the Ins or Insert button, likewise if you add one twice you can press the
Del or delete button.
When you press the Next Frame button you will see the first frame disappear and be replaced by a new black box, also under the select button you will see the frame count change from 1 of 1 to 2 of 1, strange isn't it (2 of 1). Click on the black box just like you did for the first frame, and choose the file named SkelAttacke02.bmp, you will notice two things happen, the graphic is added to the black box and the frame count changes to now read 2 of 2 (makes more sense now huh?)
Like I said I am lazy so I am not going to walk you through every frame, all you have to do is repeat the steps above for the rest of the animation (rinse, lather and repeat). You should have noticed by now that the graphics files are sequentially numbered from 01-07 for the SkelAttacke (Skeleton Attack East) bitmaps, just keep pressing the Next Frame button, and clicking on the black box and choosing the next sequential numbered graphics file, until you have added all 7. When you reach the last one the Frame Count should show 7 of 7.
Now there wasn't anything hard about that was there, didn't even hurt a bit? To see what the animation will look like, press the Previous Frame button until you get back to frame 1, then press the Play Animation button to see the animation played back. Pretty neat don't you think?
Now that we have the animation completed, let's save it. Press the Save Project
file ![]() button,
near the top left of the Animation Editor. This will pop-up the save dialog window, it
should be defaulted to your games Misc directory, save the animation with the name
of SkelAttack, this will create an animation file in the Misc directory with the
name of SkelAttack.anm.
button,
near the top left of the Animation Editor. This will pop-up the save dialog window, it
should be defaulted to your games Misc directory, save the animation with the name
of SkelAttack, this will create an animation file in the Misc directory with the
name of SkelAttack.anm.
Bring On The Foes.
Enemies, Enemies Everywhere!
What good is it to have enemy animations if we don't have an enemy to use them? I will
now step you through adding the Skeleton enemy to our game. First press the Edit Enemy
![]() button.
button.
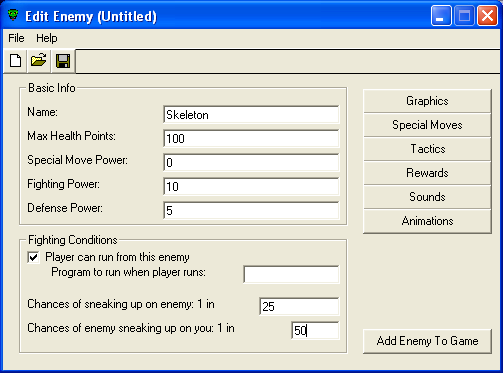
Pressing the Edit Enemy button causes the Enemy Editor to pop-up like pictured above.
First let's name our enemy Skeleton, do this by typing Skeleton into the field labeled Name: located under the Basic Info heading. Next set the Max Health Points: to 100, leave the Special Move Power: at 0 for now, we will cover that in another lecture. Then set the Fighting Power: to 10 and the Defense Power: to 5. Under the heading of Fighting Conditions click the check box in front of Player can run from this enemy, leave the Program to run when player runs: field empty. Then set the Chances of sneaking up on enemy: 1 in field to a value of 25, now set the Chances of enemy sneaking up on you: 1 in field to a value of 50.
If you remember from lecture 3, the Chances of fields are used to determine the odds of a Critical Hit occurring. A critical hit causes more damage than usual to the target.
Now we have the fight information set for the enemy, we need to have a graphical representation of our enemy, although we have defined some animation for our enemy, this is only displayed for certain conditions in a fight. We must have graphics to represent the enemy while it is idle.
In the Enemy Editor press the Graphics button to pop up the enemy graphics editor.
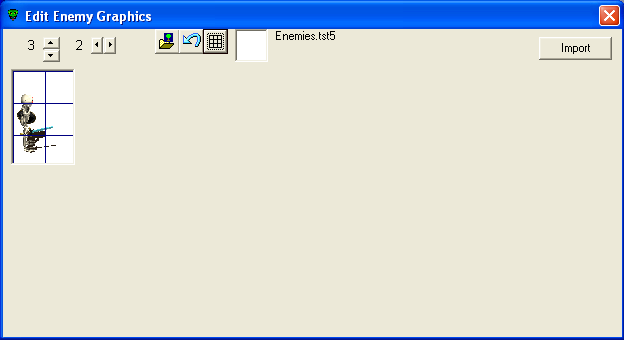
In the Enemies.tst tileset included in the resources zip files for this lecture I have added the skeleton tiles.
Once the window above pops up, set the size of the enemy graphic to 3 tall and
2 wide, by pressing the arrows. Then press the Tile Set Selection
![]() button, and choose the
Enemies.tst tileset, and construct the Skeleton graphic like you see in the above screen
shot. I have turned the grid on so you can see which tile is placed where. After you have
made the Skeleton graphics, close the Enemy Graphics Editor, and press the Rewards
button next.
button, and choose the
Enemies.tst tileset, and construct the Skeleton graphic like you see in the above screen
shot. I have turned the grid on so you can see which tile is placed where. After you have
made the Skeleton graphics, close the Enemy Graphics Editor, and press the Rewards
button next.
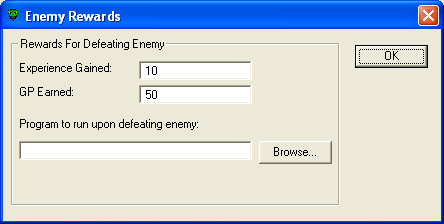
When you press the Rewards button the above window will open. Just like the screen shot shows set the Experience Gained: field to 10, and the GP Earned: to 50, then press the OK button.
Now press the Sounds button.
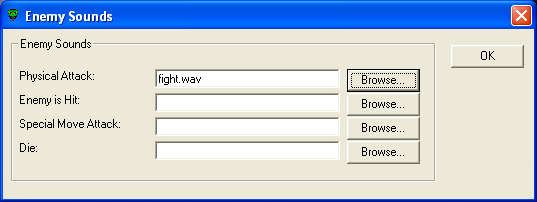
The Enemy Sounds Editor looks like the screen shot above. Click on the Browse... button after the Physical Attack: field and choose the file fight.wav for this field, then press the OK button to close the Enemy Sound Editor.
Now what about the animation we created earlier? Let's add that to our enemy now. Click on the Animations button.
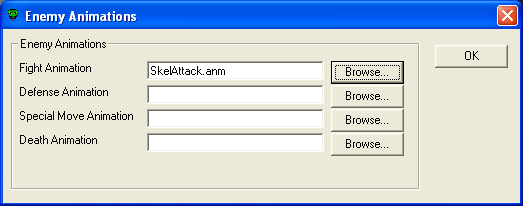
The Enemy Animations Editor shown above will then pop up. Click on the
Browse... button after the Fight Animation field and choose the SkelAttack.anm
animation file for this field. Then press the OK button to close the Enemy
Animation Editor. Now press the Save Project File
![]() button and save
the enemy as Skeleton, but wait we are not quite finished with our enemy yet. We need
to now add our enemy to the game, this is done by pressing the Add Enemy To Game button.
button and save
the enemy as Skeleton, but wait we are not quite finished with our enemy yet. We need
to now add our enemy to the game, this is done by pressing the Add Enemy To Game button.
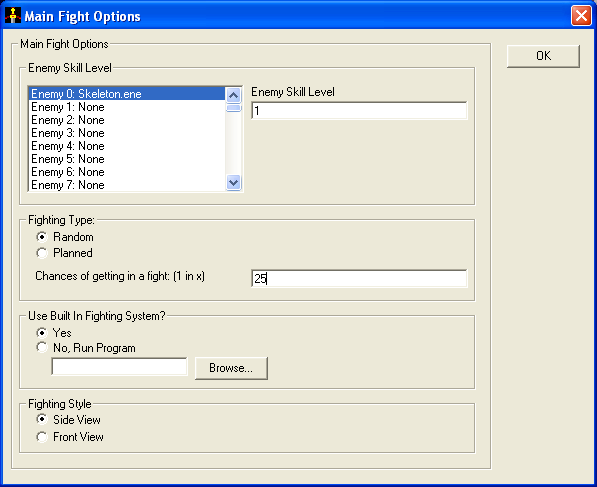
The Main Fight Options window shown above will then pop up. Now we choose a slot to
add the enemy to, do this by double clicking on the Enemy 0: slot and choosing the
Skeleton.ene enemy file we just saved. Then set the Enemy Skill Level
field to a value of 1, remember this has to match the Board Skill Level on the board we
want this enemy to appear on. Next set the Chance of getting in a fight: (1 in x)
field to a value of 25. Then press the OK button, but instead of taking you back
to the Enemy Editor it now takes you to the Main Project Editor, since we have made a change
to the Main Project by Adding an Enemy to the game, we need to save the entire project. But,
first lets click on the Fighting tab and be sure that we have fighting enabled in the
game, be sure the Yes is selected here. Then press the Save Project File
![]() button to
save the Main Project File, this will take you back to the Enemy Editor, since we are now
finished with our enemy, just close that window.
button to
save the Main Project File, this will take you back to the Enemy Editor, since we are now
finished with our enemy, just close that window.
Finally lets make a couple changes to our Characters, Alioth and Lydia. In the File Browser on the right side of your screen double click on the Chrs directory, then double click on one of our Characters.
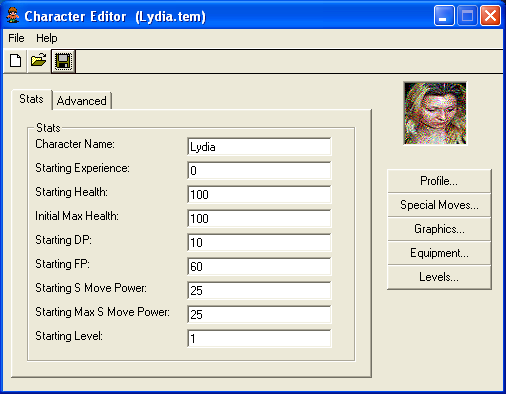
This should bring up the Character Editor like the one shown above. Set the fields to the values shown in the above screen shot. Then save you character and load the other character and make the same changes.
Now press on the Save All
![]() button to save all
the files we have changed and to save the game. Now run and play the game to see how the
new enemy works.
button to save all
the files we have changed and to save the game. Now run and play the game to see how the
new enemy works.
Cool! man, now that's what we are talking about.
Psst! Over Here I've Got Just The Item You Want.
Items, Get Your Items Here!
Walking around and getting in a fight every now and then is fun, but it gets old after awhile, so we need to add some items to the game that our player can interact with.
To add an item, just click on the Edit Item
![]() button.
button.
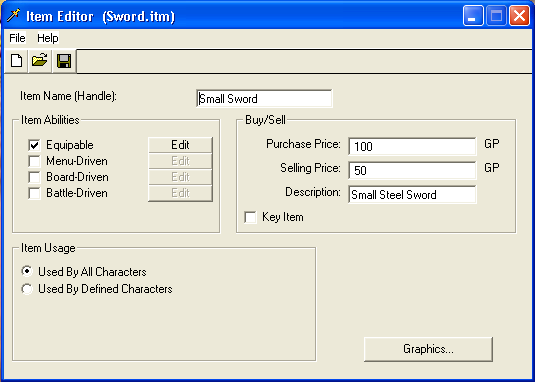
This will pop up the Item Editor as shown in the screen shot above. Since we have been talking about Enemies and Fighting, I thought a good start for the Items would be a Sword, for the player to use in battle.
The first field to fill in is the Item Name (Handle):, this field gives the item a name or handle that you can refer to in RPGCode to manipulate the item. I chose to put Small Sword in this field, the reason I chose Small Sword, was that we could later add more powerful swords into our game. Next is the Buy/Sell area, in here we tell the Toolkit the price in Gold Pieces that the Item costs, and the amount in Gold Pieces that the Item sells for. The Purchase Price: field is the amount the player would have to pay if they bought this Item from a shop, set this field to a value of 100, The Selling Price: field is what a shop would pay the player if they purchased the Item from the player, set this field to a value of 50. Next is a Description: field, this field is a description that will show up in the Toolkit when the player asks for information on the Item, or when the player equips or buys the Item, enter Small Steel Sword for the description. At the bottom of the Buy/Sell area is a check box labeled Key Item, what this field tells the Toolkit is that the player cannot drop or sell this item, if you want your player to keep an item throughout the whole game then check this box.
At the bottom left of the Item Editor there is an area called Item Usage, the fields in this area tell the Toolkit who can use this Item, if you click the Used By All Characters field, then any character can use this item, on the other hand if you click on the Used By Defined Characters field then you can tell the editor up to 50 individual characters that can use this Item, that way you can limit the item to certain characters only.
Next we get to the Item Abilities area in the top left of the editor. This area allows you to give your Item certain abilities. Check the first field that is labeled Equipable. An Equipable item is one that the player can use as a weapon or armor in a battle, which is exactly what we want with a sword. Once you check this option the Edit button next to it becomes available. Now click on the Edit button.
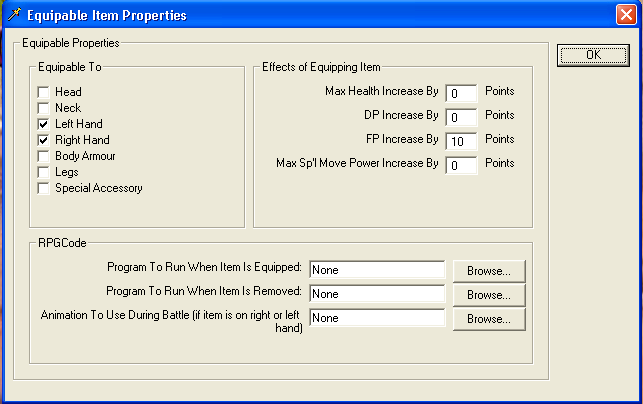
When you click the Edit button the above window will pop up. This window will allow you to specify how this item will effect the player when it is equiped. First we tell the Toolkit where the item is equipable. In this case we check off the Left Hand and Right Hand fields, after all this is a sword and the player will most likely be using it in their hands. You could tell it any body part you want, even the Head, but what sense would that make? Unless you had a unique character with a hand sticking out of their head. :) If you remember from lecture 3, the part on the Character Editor, you specify which slots could be used by the player. The Equipable To fields are pretty much self explanatory except maybe the Special Accessory choice, again remember in the Character Editor you could specify special body parts, like a Ring Finger for instance, this choice would allow you to specify that Ring Finger slot.
The next thing to do is to set the Effects of Equipping Item, this tells how equipping the Item will effect the character. In this case since this is a Sword it should increase the characters FP, something like a shield for instance would increase the characters DP, makes sense doesn't it? In these fields you enter the amount to increase these statistics by. By entering a negative number here you could have say a cursed item, that hurts the characters stats rather than helps the character. For our sword let's enter a value of 10 in the FP field. That is all we will need for our sword in the equipable section, so click OK to return to the Item Editor.
Finally we need to set the graphics for our Item. We do this by clicking on the Graphics... button.
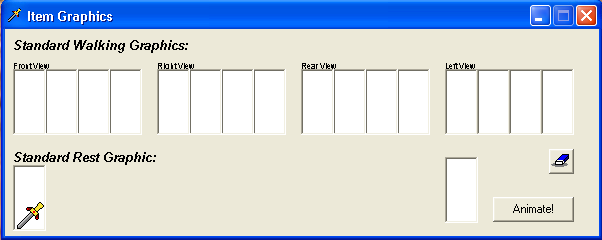
Clicking on the Graphics button will show the above window. These graphics work just like the character graphics, in that they are two tiles high, so when setting them using a standard tile, click on the bottom half of the window for that graphic.
Click on the bottom of the Standard Rest Graphic: window, then choose the
item.tst tileset, and choose the sword tile, then close the Item Graphics Window, and
click on the Save Project File ![]() button and save the Item as SmallSword.itm
button and save the Item as SmallSword.itm
What You Walking About Man?
While we are on the topic of Items, let me show you how to add an NPC that walks around. Bet you couldn't wait to see how this was done? Well, moving NPCs are done as Items in the Toolkit.
Let's do this now, start by pressing on the New Item
![]() button.
button.
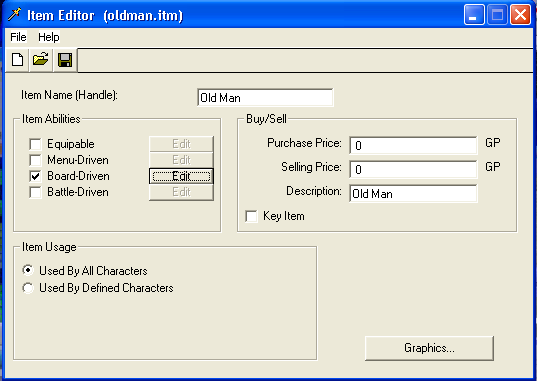
Set the fields in the Item Editor to look like the screen shot above. Then click on the Edit button following the Board-Driven field you checked.
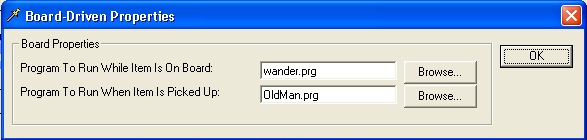
The above window will now be showing. The first field labeled Program To Run While Item Is On Board: is what is known as a Multi-Tasking program. A Multi-Tasking program is one that the Toolkit will run simultaneous, or the same time as any other programs. The Toolkit comes with a program called wander.prg, what this program does is to cause the item it is attached to, to randomly change directions. Since we want our NPC to wander around the board, set the first field to wander.prg. The second field labeled Program To Run When Item Is Picked Up: is the program the Toolkit will run when the character picks up (or steps on) the Item. Set this field to the program OldMan.prg, which we will write shortly. This is the program that will cause our NPC to interact with the character, just like our standing NPC from Assignment 1. Now click on the OK button, this will take you back to the Item Editor.
Now to add the graphics to our Item. Click on the Graphics... button now.
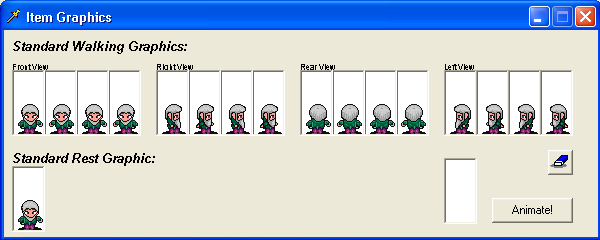
You will notice in the above screen shot that this time we filled in ALL the graphics fields.
The Old Man graphics are located in the char.tst tileset, there are two tiles
representing each direction, to fill in all 4 graphics, just alternate the two graphics for each
direction. Once you have all 4 directions filled in, click on the Standard Rest
Graphic: window, and just choose the first graphic for the Old Man. If you would like you
can click on the Animate! button to see the Item in action. Now close the Item Graphics
window, this will return you to the Item Editor. Click on the Save Project File
![]() button to save
the Item, give it the name of OldMan.itm.
button to save
the Item, give it the name of OldMan.itm.
Now that we have our NPC, we need to add our OldMan.prg program for the NPC to interact with the character. Below is the code I used in the OldMan.prg
|
#If (Gender$=="1") |
The above code looks pretty much like what you have seen already with your NPC in Assignment 1. There is a couple of small differences, if you have read the help and reference files like you were asked, you probably should have no problem figuring out what the above code does. Just in case, I'll explain the differences, since our game is gender based and we allow the player to choose their gender at the beginning, I wanted to make the game use that information in responses. If you remember in the #ChoosePlayer() method we had defined a variable called Gender$, when the player chooses the gender it places their choice in that variable. Remember choice 1 was for male, and 2 for female, therefore Gender$ will be a "1" if our main character is a male, and "2", if our main character is a female. The two #If statements at the beginning of the program check to see what is in the variable Gender$, if it is a "1", then it sets a new variable called Person$ equal to "Man", if it is equal to "2", it sets the variable Person$ equal to "Lady". In the third #MWin line we use the Person$ variable, remember you can use a variable in a message window by putting the less than and greater than symbol on each side of the variable name.
If you have not already done so, enter the above code and save it to a files called OldMan.prg. Now we are ready to add our NPC to a board, I just let the old man wander around on my start.brd, that way I can talk to him without the bother of a fight.
Let's add our NPC to our start.brd now. Load up your start.brd board now. Click on the RPGCode Menu and then on Set Item, when the Toolkit asks you to click on the tile where you want to set the Item, just pick a spot on the board and click.
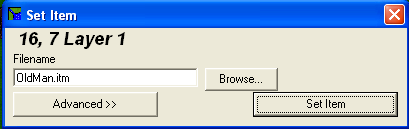
You should see a window like the one above, set the Filename equal to OldMan.prg.
Then click on the Set Item button. Now save the board and exit the Board
Editor, then for extra measure click on the Save All ![]() button in the RPGToolkit Editor to save ALL the files we may have changed.
button in the RPGToolkit Editor to save ALL the files we may have changed.
That's it now we have added an NPC that wanders around the board. Not bad for a few minutes work.
UPDATE: I'm sorry for any inconvience this may have caused those of you who have already
downloaded the lecture, but I failed to mention that if the wander.prg program fails to work,
and your NPC does not wander around, usually this is caused by the Multi-Tasking speed.
To fix this click on the Edit Main File button. Under the heading of Environment
Settings there is a slider bar labeled Multitasking Speed. Move the slider all
the way to the left to the fastest setting, then click on the Save Project File
![]() button to
save the changes. See the image below to see how I had to do it.
button to
save the changes. See the image below to see how I had to do it.
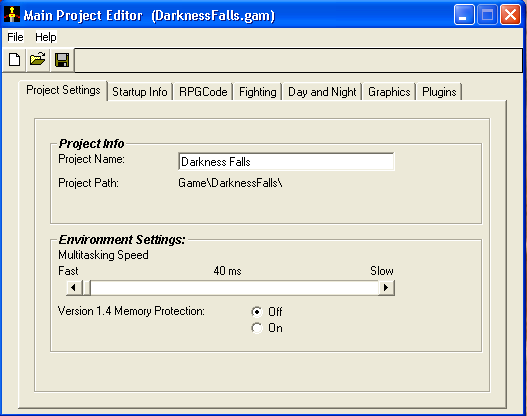
This change should fix the wander.prg problem.
Now back to our Sword, we added the Sword Item to our game, but have not made it so that the character gets it. Let's do that now, load up the start.brd in the Board Editor again.
You will notice that I have now added a chest tile to our start board. Since I am no longer using the board2.brd board that had the chest I just added one here.
I added the chest at location 13,5. But how do we get the Sword into the chest for the player to find? Very easy, just click on the RPGCode Menu then on the Set Program choice, just like the Set Item choice, it will tell you to click on the tile that you want to set the program at, click on the chest tile, and enter the Program Name Chest1.prg. Below is the code that I placed in my Chest1.prg program.
|
#If (Chest1Empty! = 0) |
The #GiveItem command is used to give an Item to the character, in this case we are giving our character the SmallSword.ite. I used the Chest1Empty! variable to let me know if the character has opened the chest yet, and retrieved the sword. The HaveSword! variable is one I added to tell if the character has the sword or not, this variable we will use in the next lecture, when I show you how to replace the closed chest on the board with an open chest.
Spruce It Up A Little Bit.
Making The Introduction A Little Less Bland.
Now let's spruce our introduction up a little bit, so it does not look so bland. In the resource files for this lecture I have included a file called DFBackground.jpg, let's add this graphic as a background behind our introduction text.
First because of the size of the graphic file and to make things look a little cleaner let's
click on the Edit Main File ![]() button. Then click on the Graphics tab.
button. Then click on the Graphics tab.
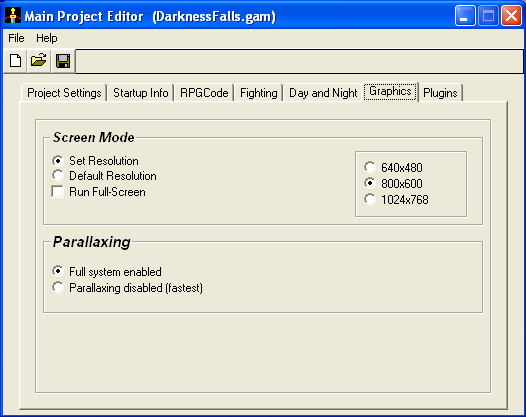
Once you get to the point shown in the screen shot above, under the heading of Screen
Mode, choose the 800x600 field. Then click the Save Project File
![]() button, to
save the game.
button, to
save the game.
Now to make the changes needed in our start.prg program to set this background image. Below is the changes to be made, I have placed the changes in BOLD so you can see them.
|
* Starts when you click the new game button |
Well, that's it for another lecture, in lecture 5 we will be covering Shops and Inns, also we will cover replacing the closed chest with an open chest.
We will also be covering Overworld boards as opposed to the board we have been dealing with which I refer to as Street Level Maps. By the way I noticed the overworld maps was mentioned in a student post to the discussion forums. Hmmmmm..... you students wouldn't happen to be peeking at my lecture notes would you? :-D
Please be sure to do any assignments I add to this weeks lecture, and turn them in.
Later Gator, After Awhile Crocodile!
This is the end of the fourth lecture. It is now time for you to continue on to the assignments and to answer any quiz or survey that I might add to this weeks work.
Good luck!
Ferlin