|
|
|
Written by Ferlin Scarborough.
Goal of the lecture
The goal of this lecture is to teach the student how to add shops and inns to a game,
also to explain Over Worlds and how they operate.
WARNING: This lecture contains a lot of images and therefore may take longer to load.
Getting In Contact With The Teacher.
If you need to contact me, use either my email at gameprogramming.org or use the course forum. If you have any questions, the course forum is a good place to see if there is anyone who can help you, and you would probably get a faster answer than from me.
Resource Files For This Lecture.
There are a few resource files available for this lecture, so now would be a very good time to download those and install them, below is a list of the resource files and where they need to be installed (Unziped).
The path names listed below assumes that you installed the Toolkit into its default directory, if not you will have to modify these paths to suit your needs.
I'm Overlooking A 4 Leaf Clover, That I Overlooked Before.
Over-World Maps.
Let's start this lecture by discussing Over-World Maps. What is an Over-World Map you ask, well so far in the lectures we have been creating boards for our game that are what I like to call a Street Level Map, since we are walking through the streets so to speak. On the other hand there is the Sky Level Map. If you have ever played Dragon Warrior or games similar to that, you are familiar with Over World Maps rather you realize it or not.
An Over World map is a board that looks like you are viewing it from an Airplane or balloon or something up in the air. You are way up there and looking down OVER the land, you can usually see forests and mountains and rivers, towns and castles and so on. I have been told by several of my students that you learn more by doing than reading, so let's just create ourselves an Over World Map, so you can see what I am talking about. Below is a screen shot of an Over World board that I threw together real quick like.
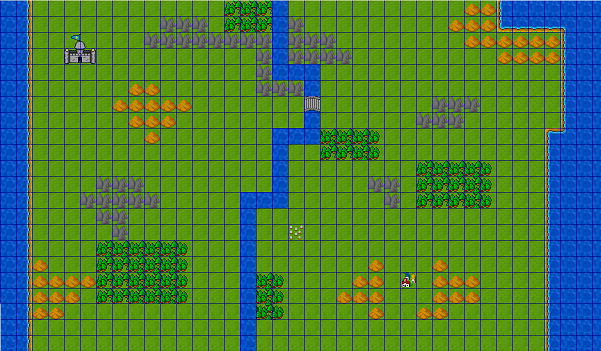
First let's go into the board editor (You should know how to do that by now). The first thing we will do is to adjust the size of the board, this will give us more room to create our Over World in, it will also cause the game to have a scrolling effect as we walk around in our Over World. Now click on the Board Settings Menu then click on Board Information, next click on the Size tab. You should now see the window pictured below.
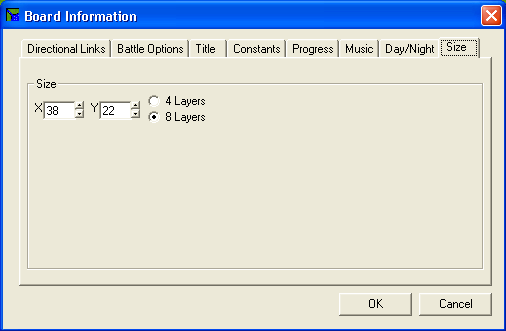
Let's double the size of our board, you do this by changing the X field to a value of 38, and the Y field to a value of 22. Then click on the OK button, this should return you to the Board Editor.
Included in the resource files for this lecture are some extra tiles, if you have not installed them as directed above, please do so now.
The tiles in this file are some of the Dragon Warrior tiles, I took them from Mickey Crocker's (better known as White Devine) tileset that he used to create Never Ending Scroll. for all you Dragon Warrior fans out there, this game was created along the lines of that series of games, right down to the battles, and game play. If you would like to try this game just go to the http://www.rpgtoolkit.com Web Site, and click on the Resources choice, then click on the link to Mystic Software.
I redid each of the tiles so that they would fit in with the default tileset, like changing the Grass and Water on each tile. I then saved the tiles into our DarknessFalls.tst tileset. So, in order to create the board shown above I used these tiles along with some of the tiles from the default.tst tileset. Create the above board and save it with a name of ChulakOW.brd, Chulak by the way is the name of the town shown on the Over World Map.
Due to the size of the picture I had to reduce it to fit on this page better, but if you look close, you will see what looks like little white dots located at 19,15 on the board (toward the middle of the board 8 tiles from the bottom and 3 tiles to the right of the river), this was a tile that I created to represent our Grave Yard. I will be using this tile to show you how to do what is known as a Warp Tile.
Some Of Us Have Such Warped Minds!
A Warp Tile, is a tile that you set on a board that will warp or send the player to another board. First let's load up our Cemetery.brd board and make a little change to it, we don't want any thing in the cemetery to escape now do we? So, let's build a wall around the cemetery, most of them have one any way. Make your cemetery board look like the one pictured below.

You will notice that I have left two tiles on each side that are not blocked by the wall. These are the tiles that the player will use to exit the cemetery. Don't forget to set the Tile Type on the wall to Solid, and the two tiles to exit to a Tile Type of Normal. Usually any board you create will have a wall of something around it, like in your towns or in a castle, with exits that consist of one or two tiles. You can make boards without a wall or something surrounding it, but then you would have to set every tile along the edges of that board to Warp Tiles. Go ahead and add the wall to the cemetery board now. Once you finish adding the wall, save the board, and let's move on to how to set a Warp Tile.
To create a Warp Tile, you click on the RPGCode Menu, then click on the Set Warp Tile choice, this will then pop-up a message telling you to click on the tile that you want to set as a Warp Tile. Click on the plain grass tile located on the left side of your board in the middle of the wall. This will pop-up the window showing below.
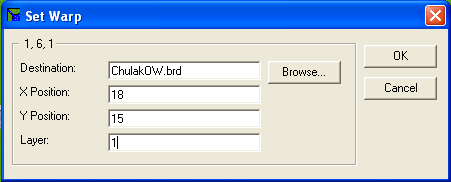
Now let's choose the board to send the player to when they step on our Warp Tile. Set the Destination: field to ChulakOW.brd, this is the name we saved our Over World Board as. Now that we have told the toolkit where to send the player we have to tell it, where to place the player on that board. Set the X Position: field to a value of 18, then set the Y Positition: to a value of 15, next set the Layer: field to a value of 1. These values assume that you created the Over World board EXACTLY like, mine and placed the cemetery tile at location 19,15.
After you set the values of these fields, click on the OK button to create this Warp. Now let me explain what happened when you clicked on the OK button. The toolkit created a program and named it (if it was your first warp tile), warp00000000.prg. In this program the toolkit added the following commands.
|
*Warp tile generated by board editor |
The #send command "sends the player to another board", the one specified in the double quotes in the first parameter, then places them at the location specified by the next three parameters, the second parameter in the command is the X position and the third is the Y position, the last parameter is the board layer. Makes sense to me. Each time you create a new Warp Tile, the toolkit adds 1 to the warp program name when it creates a new warp program. For instance when you create your second Warp Tile the program created will be named warp00000001.prg and so on.
Warp Tile Warning: Let me warn you now that there is a quirk in the toolkit when it creates warp tiles, if you go through the process of creating a Warp Tile again for the same tile you previously created one for, the toolkit will add another warp program, but if you run the game it will still use the first one. This will make you think that the change you just made did not take effect. There are two ways of fixing this problem, you can right click on the tile you had previously set a warp tile for then click the edit button next to the warp tile program name, and change the name to the new warp program the toolkit created. Or, the way I prefer is to change the first warp program the toolkit created for that tile. Usually you are setting a second warp tile for the same tile, because you gave it the wrong values when you created it, and it was going to the wrong place on the board it was warping to, so by just changing the parameters for the #send command in the warp program will fix this.
Now back to our warp tile we just created. The coordinates we entered will place the player at the location on the Over World board that is one tile to the left of the cemetery tile, since we exited the left of the cemetery it only makes since. Now create a Warp Tile for the exit on the right side of the cemetery and give it the X,Y values of 20 and 25, since we are exiting to the right of the board we want to place the player one tile to the right of the cemetery tile or 20,15. Now resave the cemetery board, and reload the ChulakOW board, we need to set the Warp Tile to send us to the cemetery when the player steps on the cemetery tile in our Over World.
Use the same procedure we used for the cemetery board to create a Warp Tile. Click on the cemetery tile as the one for the Warp Tile, and enter the cemetery.brd board name for the Destination, for the X and Y values enter 19 and 4 for those fields. If you created the wall exactly like mine, this location on the cemetery board will be the grass tile in the wall on the right side of the board. After you create this Warp Tile, you need to set the player position on the board to some where like say by the bridge maybe, to tell the toolkit where to start the player on the board. Now save your ChulakOW board again, then close the Board Editor.
Now we need to change our start board to our new Over World board, you do this by clicking
on the Edit Main File ![]() button, then clicking on the Start Up Info tab, now set the Initial Board File to your
ChulakOW.brd file you just created. Now save the Main File and close the Main File Editor, then click on
the Save All
button, then clicking on the Start Up Info tab, now set the Initial Board File to your
ChulakOW.brd file you just created. Now save the Main File and close the Main File Editor, then click on
the Save All ![]() button in
the RPGToolkit Editor to be sure all the files we changed are saved.
button in
the RPGToolkit Editor to be sure all the files we changed are saved.
Now let's have a little fun, run the game and walk around on your Over World Map, then step on the little cemetery we have there. If you did every thing correctly, this should change to the cemetery board and place you on the grass tile in the wall on the right side of the cemetery. You should be able to walk around the cemetery and get in a fight just like you could before. When you are done slaughtering Skeletons and Ghosts, you should be able to walk to one of the exits in the wall and be sent back to the Over World map, and be on the side of the cemetery you exited from. Interesting isn't it? There you go you have just learned how to create Warp Tiles, to send you from one board to another, by stepping on a Warp Tile and how to get back to your Over World Map, just like Dragon Warrior isn't it? We will use warp tiles to send us into our town and castle.
You can create as many Over World board as it takes to get a complete world set up. You use the Links under the Board Information Menu, to go from one Over World board to another and back again. That my students is how you set up your Over World of the land in a nut shell.
Shops The Adventurer's Friend.
Where Can A Person Shop Around Here?
Now that you know how to add Items to your game, we will add a couple more Items to our game, then we will set up a shop to purchase and sell those Item's in.
First let's add a few more Items to our game. I should not have to tell you how to do this, I feel it was covered enough in the previous lecture.
Below is the list of Items to be added and the information to set up. Please create these items using the following attributes.
Now that you have added these couple of items. It's time to prepare a place that the adventurer (or player if you will) can go to get some of these items.
Let's start out by creating a town for our game. I created a town called Chulak, but to keep it simple I made the town small, I created a board that I doubled the size of, just like we did with our Over World map, I sized the board to 38X22. Below is the town that I want you to create now.
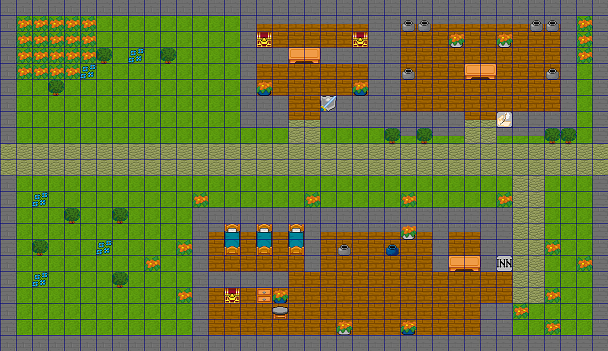
As you can see the town only consists of an Inn, an Items Shop and a Weapons Shop. Most of the time towns also have some houses in them and are a little bigger than this. But, this will give you the right idea.
Looking back at our Over World board you will notice the little town down near the bottom right. I placed this town at the tile located at 26,18, so all the X and Y coordinates I use in my examples are based on this fact, you may have to adjust them for your game if the town is located in a different place.
After you have created the above board, save it with the name of Chulak.brd. Now let's get down to working on our Shops.
In the top right of the board is the Items Shop. The first thing to do to the Items Shop is to add the Shopkeeper, when you just created your items we added an item called ChulakShopKeeper.itm, this is our shopkeeper NPC. To add the shopkeeper, click on the RPGCode Menu, then click on Set Item, when it asks for the tile to set the item on, click on one of the tiles behind the desk in the Items Shop, then tell it the item is the ChulakShopKeeper.itm. Now click on the Set Item button. There now we have some one to talk to when we enter our shop. Go ahead while your at it and do the same thing for the Weapons Shop next door, use the same item for the shopkeeper.
We now have our shop keeper for the Items and Weapons Shops, but we still need a way to let the player buy and sell things in the shop, how is this done?
This is done by writing an RPGCode program. The Toolkit has a built in shop system that we can use, or you can write the whole shop system from scratch. We are going to use the built in shop system. Create a program for the Items Shop that looks like this.
|
* Chulak Items Shop |
Save the program as ChulakItemShop.prg. The way this program works should be fairly obvious to you by now, but just in case let me explain it a little bit. The first to lines of text have an "*" in front of them, remember these are just comments or remarks. The last line is the power of this program the #CallShop command. The way this command works is that it calls the built in shop system, and we pass it the items for sell in that shop, in this case we pass it our potions items. If you remember when you created these potions you gave them the Purchase Price and the Selling Price.
While you are in the Program Editor go ahead and tell it you want to create a new program and type in the following program for our Weapons Shop.
|
* Chulak Weapons Shop |
Save this program with the name ChulakWeaponShop.prg. Obviously this program works exactly the same as the previous one.
Remember we have 3 more programs we need while we are at it. Remember when you created the 3 potion items, you told it a program to run when the item was used, we gave that field a program name that we did not have yet. Create the following 3 programs.
UPDATE: I looked at one of my games that I had written a while back and discovered where I had run into the exact graphics bug problem with the potion's in that game. I guess I must have had a brain lapse at that time, because I had actually put comments in the programs about that problem. How soon we forget! :) Below I have corrected the programs for our potion's and I left the comments in there for future reference.
|
* Effect of Drinking Blue Potion |
Save this program using the name BluePotion.prg
|
* Effect of Drinking Red Potion
|
Save this program using the name RedPotion.prg
|
* Effect of Drinking Green Potion |
Save this program using the name GreenPotion.prg
All the commands except the #TakeItem() Command used in these 3 programs we have used before, so if you do not know how they work, then you have not been reading the lectures and doing your assignments like you should. The #TakeItem() command removes an item from the player inventory. As for the health points mentioned in the programs, that is added from what we set them to in the Item Editor when we created our potion items.
Time to get back to our shops. Go back to the Board Editor where we have our Chulak.brd board loaded, if you no longer have it up, bring the Board Editor back up and load that board. To set the shop system up on this board we need to tell it to run our new shop programs. This is done by clicking on the RPGCode Menu, then clicking on Set Program. When it asks for you to choose the tile to set the program for, choose the tile right in front of the desk, in front of the tile you set the shopkeeper item on, in the Items Shop. The following window should then pop up.
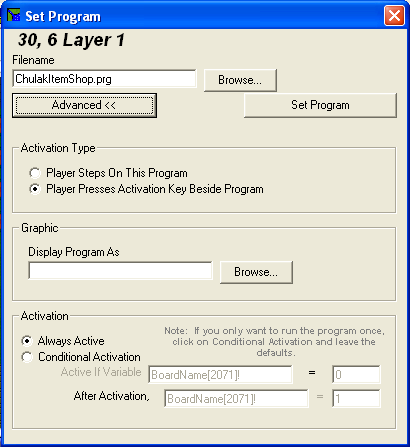
Set the Filename field equal to ChulakItemShop.prg, the shop program we wrote for the Items Shop. Next under the heading of Activation Type choose the one that says Player Presses Activation Key Beside Program. Why did I choose this choice instead of the one that says Player Steps On This Program? I did this for personal preference, because I can't stand an RPG where every time I walk past the desk that PUSHY Shopkeeper bugs me about buying something. This way the player has to press an activation key to talk to the shopkeeper. We will set which key is the activation key in a moment.
Now press the Set Program button to set our program. Now do the same thing to set the program for our Weapons Shop, using the ChulakWeaponShop.prg program. Save your board and let's go set the activation key, do this by click on the Edit Main File button, then click on the RPGCode tab. The Main Project window should now look like the one below.
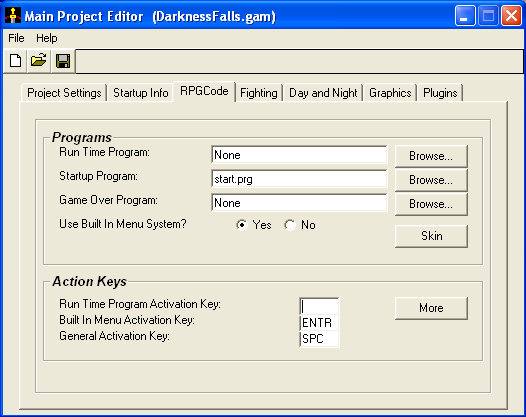
Click on the field next to General Activation Key: and press the SPACE bar to set the Activation Key to SPC. Now save the main file and exit the Main File Editor. What we just did was to tell the Toolkit that our Activation Key is the Space Key, that way when the player is standing on the tile with the program set to talk to the Shopkeeper, and presses the Space Bar, the program will be activated.
Man Am I Ever Tired!
Give Me An Inn.
All that wandering around the land and fighting the enemies, is wearing the poor players health down, and if they don't do something to build it back up, they will certainly die. The most common way in an RPG to build your health back up is to find an Inn and spend the night, that way you wake up fresh and returned to full health.
Let's add the elements needed to implement an Inn in our game. Load the Chulak.brd board back up, we added an Inn to this board near the bottom around the center of the board. See it there?
The procedure to add the Inn is exactly the same as adding a shop, the only difference will be in the program we use to implement the Inn. First set the item for the Innkeeper, set it to the tile on the right, behind the desk, and use the ChulakInnKeeper.itm item to do this. Next we need to add our Inn program, now this one is a little bit longer than the ones for our shops. Listed below is our Inn program.
|
* Chulak Inn |
Now let's discuss our Inn program a little bit. By now you should have at least glanced at the RPGCode Reference included in the help. For more information on each of the commands used in this Inn program please refer to that document.
The first section of the program deals with our player characters gender, I created a variable called PlayerChar$ to store the player characters template name, this will be used later on to move the character around on the screen manually. The Gender$ variable stores the choice the player made for gender when the game started 1-Male, 2-Female. The next thing I did was to get the amount of gold the player had and placed it in a variable called Gold! using the #GetGP command this places the amount of gold the player has in the variable given inside the parenthesis () characters. The next step is to set the text size and display speed, this is done with the #FontSize and #TextSpeed commands respectively. The #SaveScreen command saves the current displayed screen into a buffer that we later can restore using the #RestoreScreen command. We use the #SetImage command to place an image on the screen, in this case the Message Window graphics, which is stored in the Bitmap directory in a file named mwin.jpg. Next using the #Text command we display a message in the message window we just placed on the screen that welcomes the player to the Inn and tells them the price to spend the night, and ask if they would like to stay. Then using the #SetButton command we add two buttons to the screen, then place a Yes by one and a No by the other.
Now for the heart of our Inn Program. We use a while loop to check for the player pressing one of our buttons, then based on which one they choose we then proceed to act on that choice. If the first button (Yes) is pressed then we proceed to check using the Gold! variable we have the amount of gold stored in, if the player has the 5 gold pieces required or not. If the variable is less than or equal to 4, then that means the player is too poor to stay at our Plush and Lavish Inn, so we display a message telling the player they do not have enough gold, to come back when they do. Then we restore our saved off screen so it's back the way it was and removes our message window, then set the while loops variable so it will fall out of the loop and go to our #End command which will end our Inn program.
On the other hand, if the player has enough gold to stay the night, we then display a thank you message and restore the screen, we then use the #Push command to push the player around on the screen, the first parameter being the direction to push the player one tile in, and the second parameter being the character to move.
Warning: The #Push commands I use here is based on the Inn being laid out EXACTLY like the one I did in the screen shot with everything in the same place tile wise.
What I do is to push the player West by 10 tiles, the North by 1 tile then West again by 2 tiles. This makes the player appear to walk from the front desk in the end and walk to the foot of the middle bed in the bedroom.
The next command is the #Inn command, what this does is to set the players HP,DP,SMP back to the amounts they are at when the player is at 100%, on all of them. Then the screen is faded out to show that something has happened (the player slept for a while) then there is a one second delay, and we redraw the screen back to the way it was before we faded it out using the #ForceReDraw command, then set our while loop variable so it exits the loop and ends the program.
Finally we check if the player had chosen the No button, if so then we just end the program. Once again, if you need to understand these commands better then look them up in the RPGCode Reference help file.
After you type in this program save it using the name of ChulakInn.prg. Now go back to the board editor and click on the RPGCode Menu, then on the Set Program choice and click on the tile to the right front of the desk in the Inn, and choose the ChulakInn.prg program file. By the way, you did remember to set the Ambient Effect to Darkness under the Board Lighting Menu didn't you? Now save the board and save the entire program using the Save All button.
Whoo Whoo! now our game implements Shops and Inns. Play the game a little bit and walk around the Over World Map, go to the cemetery and fight a battle so you can get some gold then leave the cemetery and walk to the town of Chulak and go into the Inn, check your stats by pressing the <ENTER> key to bring up the menu screen, look at your health, and gold amounts. then walk to the right front of the desk in the Inn and press the <SPACE> bar and press yes to spend the night, then after you spend the night in the Inn, check your stats again, your health should be back to full health, and you should have 5 gold less. Now go into the shops and purchase something, then check your stats under items to see that you have them.
When you go to one of the shops to purchase something, you will see the Shop System Screen pop up, it should look like the one below.
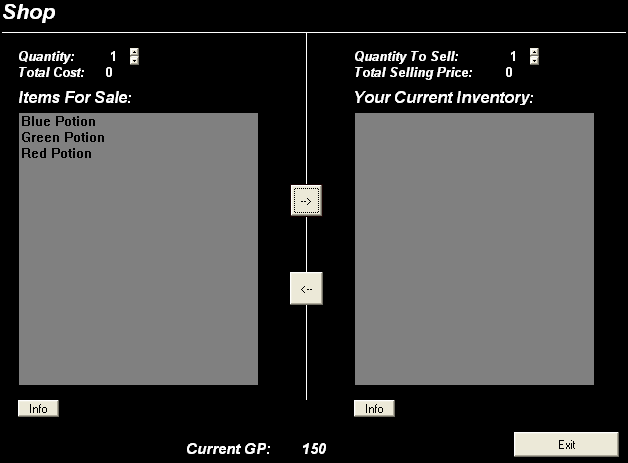
There you have the shop interface screen that the #CallShop command brings up. You will notice that it contains the items that we passed to it within the command.
Which Is My Best Side!
Give Me Your Profile.
Jonathan Ball, this ones for you, so you can stop crying now. lol :)
Jonathan said I was unfair because I was showing some stuff in the lectures that I did not include in the resources. So here is the Character information for Lydia.
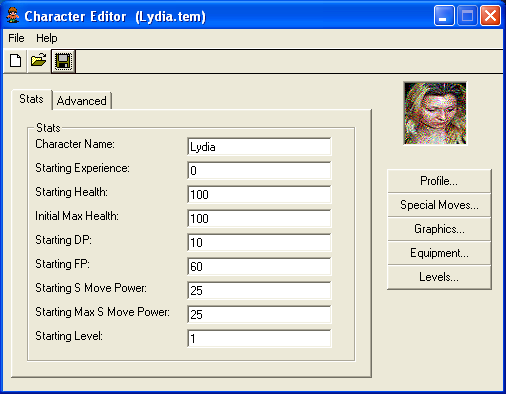
Notice that Lydia has a profile picture located on the right near the top of the Character Editor, I discussed Character Profiles a little in lecture 3, so for more information look back at that lecture. If you click on the black box where the profile picture goes or click on the Profile... button it will open a file dialog window that will let you choose a graphic for the profile picture. Included in the resources for this lecture is a picture named Lydia.gif, choose that picture and your Character Editor should look like the one above, now save the character, and the Toolkit will handle the use of the profile in the stats menu. Sorry I have not done a character profile for Alioth yet, but I will do that at a later date.
Note: Due to time constraints I am sorry but I did not get to the chest program and changing the graphics to an open chest, but I promise it will be the first thing in the next lecture.
Ever feel like you were forgetting something? Well, I have that feeling now so if I missed something on this lecture, I'm sorry and I'm sure someone will gladly point it out.
Please be sure to do any assignments I add to this weeks lecture, and turn them in.
See You On The Flip Side!
This is the end of the fifth lecture. It is now time for you to continue on to the assignments and to answer any quiz or survey that I might add to this weeks work.
Good luck!
Ferlin