|
|
|
Written by Ferlin Scarborough.
Goal of the lecture
The goal of this lecture is to teach the student how to add animated tiles to a game,
also to explain how to add a Movie Credit Style Title sequence.
Getting In Contact With The Teacher.
If you need to contact me, use either my email at gameprogramming.org or use the course forum. If you have any questions, the course forum is a good place to see if there is anyone who can help you, and you would probably get a faster answer than from me.
Resource Files For This Lecture.
There are a few resource files available for this lecture, so now would be a very good time to download those and install them, below is a list of the resource files and where they need to be installed (Unziped).
The path names listed below assumes that you installed the Toolkit into its default directory, if not you will have to modify these paths to suit your needs.
Open Up To Me.
Replacing Tiles.
Well, here it is just like I've been promising you. At some point in your game you probably want to replace one tile on your board with another one, usually after something takes place in the game. For example you have a treasure chest tile on the board and after the player gets the contents of the chest you would like to replace the tile of the closed chest with a tile representing an open chest. How would you go about accomplishing this?
First of all in our DarknessFalls.tst tileset we have a tile of an open chest.
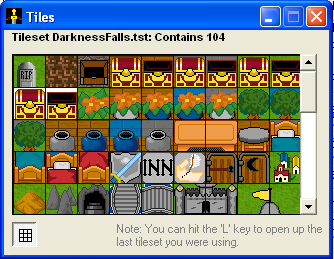
Here is a snapshot of the first 45 tiles in our DarknessFalls.tst tileset.
In the last lecture (lecture 5) we created a town called Chulak and in that town we created an Inn. Near the bottom left of the Inn, there is a chest. I placed the mouse over the chest and took a screen shot of it, so the below screen shot shows that the chest tile is located at 15,19 you can see this on the Board Editor near the top right, just under where it says Draw Lock.

The Chulak Inn in the town of Chulak. This picture shows the chest we will be working with.
Since the closed chest is sitting on the wooden floor, then we will need an open chest that has a wooden floor behind it or is transparent. It just so happens if you look at the picture above of the tileset we have a tile of an open chest with the wooden floor behind it.
If you are not already aware of it, each tile in a tileset is numbered starting with 1. If you look at our DarknessFalls.tst tileset you will notice that the chest tile I am referring to is tile number 5. Armed with this information you can refer to a specific tile in a tileset using the following syntax DarknessFalls.tst5, notice the 5 on the end of the tileset name, this tells the Toolkit that we are referring to the 5th tile in our tileset. Now that we understand the tile numbering concept, let's start working on tile replacement on a board.
Replacing The Closed Chest With An Open Chest Tile.
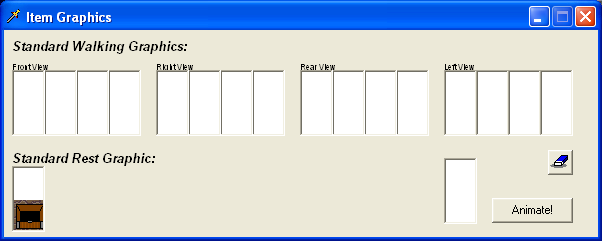
The first thing we need to do is to create an Item of the open chest. Create a new item that looks like the one below.
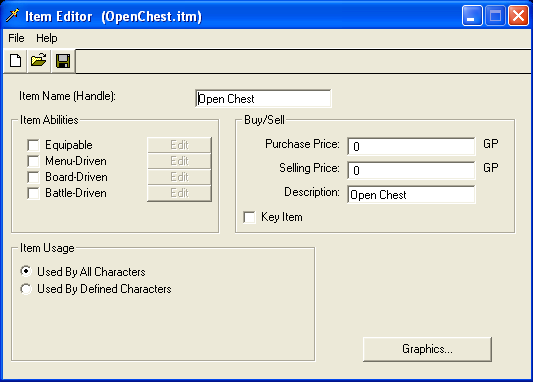
Save this new item with the file name of OpenChest.itm.
Next we need to create an RPGCode program to do the tile replacing for us. Here is the one that I use called Chest1.prg, create the following program and save it using the name of Chest1.prg.
|
#If (Chest1Empty! = 0) |
Most of the commands in the above program you are already familiar with, the new ones used here that may need to be explained a little further would be the #LayerPut(), #SaveScreen(), #RestoreScreen() and the #Done() commands.
The HaveSword! variable we will be using later on, to tell if the player has gotten the sword yet or not.
Good, now we have a program to do the tile replacing for us, so let's put this new program to work for us. Load up the Chulak.brd board into the Board Editor. Next click on the RPGCode Menu then click on the Set Program choice, and click on the chest in the Inn, and choose the Chest1.prg program we just created. Now save the board again, and if you like test run the program to see what happens.
If you test ran the program and walked into the Inn and up to the chest, you probably noticed that it did what we wanted. Once we got the sword it replaced the closed chest on the board with an open chest. But wait a minute, what happened when you left the city and came back? The chest was closed again, what happened? Did our little ghost George come along and close it then giggle at us about it?
What happens is the Toolkit forgets all about the changes we make to a board at run time once we leave that board, so when we return it reloads the original board. So, anyone have any ideas how we can overcome this little problem with our chest?
I know there are probably many different ways to solve this little annoying problem. The first time I did this in one of my games, it took me a while to figure out a way to "Trick" the Toolkit into doing what I wanted. But, finally I came up with this little solution to solve it.
Create the little program listed below and save it as OpenChest.prg.
|
#LayerPut(15,19,1,"DarknessFalls.tst5") |
Be careful now, these long programs can be hard to follow. :)
Load up the Chulak.brd board again into the Board Editor, and click on the RPGCode Menu, then click on the Set Program choice, and click on the chest. This will pop up the following window.
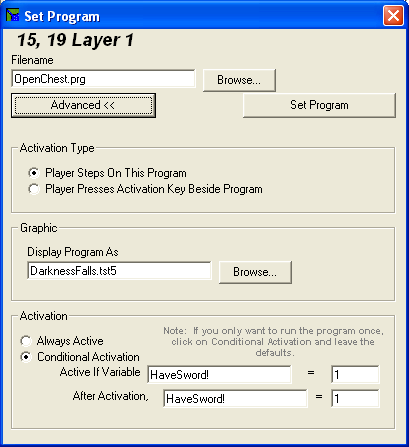
First set the Filename field to OpenChest.prg the program you just created. Then set the Display Program As field under the graphics section to the open chest tile in your tileset (tile 5). Next choose Conditional Activation choice and in the field labeled Active If Variable type in the variable name of HaveSword!, then set the value for this variable to 1, then make the same changes to the field labeled After Activation,
What we did here was to set a program on the chest tile, that would not be active at first because the HaveSword! variable is equal to 0, looking back at our chest1.prg program you will notice that when the player opens the chest and the sword is given to them the variable HaveSword! is then changed to a value of 1. Told you I would get back to this variable later on when we created the Chest1.prg program. Once this program is activated and runs, we make sure the HaveSword! variable remains at a value of 1, that way the program will continue to be ran. The end result is if we leave the board and come back, the OpenChest.prg program will see that the variable HaveSword! is equal to 1 and run again, setting the graphic for the chest tile to our open chest tile. Every now and then you will come across things like this in the Toolkit that just seems to go against what you are trying to accomplish. But, you can see that with the power of RPGCode you can overcome just about anything like this.
Now click on the Set Program button on this screen to set the program, then save your board again, and try the game once more, this time when you get the sword from the chest it should open up, and if you leave town and return it will still be open. Great that is exactly the effect we were after.
I'm On The Move.
Animated Tiles.
Now it is time to discuss animated tiles. You may be wondering just what you would use animated tiles for? Well, you can use animated tile to add some motion to your boards, such as a torch where the flame is moving, or flowing water or any type of motion you would want on a board.
You can create animated tiles by clicking on the Edit Animated Tile
![]() button.
Which will pop up the Animated Tile Editor, like the one showing below.
button.
Which will pop up the Animated Tile Editor, like the one showing below.
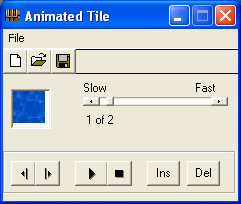
The Animated Tile Editor works almost exactly like the Animation Editor, if you are not familiar with the Animation Editor, then you have not done the previous lectures and are not supposed to be this far yet anyway. I have added the water tiles to the DarknessFalls.tst tileset, for each water tile there are two tiles, each one the water is a little different in.
To create our animated water tile, click on the white box in the Animated Tile Editor and then
click on the DarknessFalls.tst tileset, and choose the first water block, like the one in the
picture above. Next press the Next Frame![]() button, and then click on the white box again, this time choose the second water tile.
Now press the Previous Frame button, the one to the left of the Next Frame button.
This will take you back to the first frame of your animation, now slide the speed bar a little
to the right, like shown in the picture above. Now press the Play Animation
button, the one that looks like a black triangle pointing to the right. You should
see the water moving now. To stop the animation, just press the stop button the one
that looks like a little black square.
button, and then click on the white box again, this time choose the second water tile.
Now press the Previous Frame button, the one to the left of the Next Frame button.
This will take you back to the first frame of your animation, now slide the speed bar a little
to the right, like shown in the picture above. Now press the Play Animation
button, the one that looks like a black triangle pointing to the right. You should
see the water moving now. To stop the animation, just press the stop button the one
that looks like a little black square.
Now press the Save Project File![]() button, and save the animated tile as Water1.tan, note the Toolkit adds the .tan to the
filename so you know it is a Tile Animation.
button, and save the animated tile as Water1.tan, note the Toolkit adds the .tan to the
filename so you know it is a Tile Animation.
Now all you have to do is to load up your Over World map and when you choose the tile to lay down on the map, instead of choosing a tileset tile, just choose the Water1.tan file. You will notice that up where it shows the current tile, it will show the tile animated, there is a play animation and stop animation button just under the current tile displayed, that you can turn the animation on and off with. When you click on the board to place the tile, it will not be animated on the board itself. What I do to keep from missing a tile since they look like the ones already there, is to take a tile like the Magic Scroll tile and place it down first, then overlay it with the animated tile, that way I do not miss placing a water tile. If you save your board and run the game you should see the tiles you placed animated on the screen.
A little side note for those interested.
|
What I did to create the tiles to be used in the animations, was to go into the Tile Editor and load up the tile I wanted to animate. Then I saved it into the DarknessFalls.tst tileset. Once I did that I clicked on the eraser and erased all the water, but left the shore portion of the tile so everywhere there was water was now transparent. I then saved this tile into a work tileset I used called ferlin.tst, believe it or not, I usually use the first tile in this set, and just keep overlaying it. Then I loaded up the water tile from the default.tst tileset. I then clicked on the Tools menu and chose the rotate option, then I clicked the Tools menu again, and choose the Layer Tile option. I then chose the tile in my ferlin.tst tileset with the transparent area where the water was, and clicked on the Layer button. I then saved this tile into the DarknessFalls.tst tileset next to the original tile I started with for this animation. This created one tile just like the one in the default.tst tileset, and one tile with the water portion rotated. When placed back to back and swapped over and over it creates the illusion of moving water. |
Pretty cool isn't it? With the water moving it makes the world seem just a little more real.
What's Showing At The Movies?
Creating A Movie Style Introduction.
While we are in here making things look better in our game, why not add a Movie Style Introduction to the game?
There is more than one way to get the Movie Style Introduction effect into a game, one way is to create an AVI file of the introduction, then use the #PlayAvi or the #PlayAviSmall command. The difference in these commands is the first one will play an AVI file Full screen, while the second one will play the AVI file in a window. For more information on these commands and how they work, look them up in the RPGCode Reference. Since most people do not have the software available to create AVI files I opted to use a different approach that I knew all my students could use.
I decided to create our Introduction using a series of graphics files, so I created a whole series of .png files for our Introduction.
Now that we have a series of graphics files, how do we accomplish the look of a Movie Introduction?
Very simple we use the #BitMap command in our start.prg program. Here is what our new start.prg program looks like, with the changes I have made in BOLD.
|
******************************************************* |
You might want to print out a copy of the start.prg program, so you can compare it to the one listed above to see any changes that have been made, I may have missed something when I made the changes BOLD.
The first thing I did was to move the #include("fadetext.prg") command higher up in the start program, so that it would be included before the drawtitle method is called. Since we will be using fading text in the introduction sequence.
The next change I made was to the prompt command in the while loop I changed what the prompt was saying to "Read Background Story (Y/N):" after all it really is not an introduction, it's the background story for our plot. We are about to add the actual introduction with these changes to the start.prg program.
Then I made the changes you see to the drawtitle method, basically I added a ton of #BitMap commands to display the sequence of graphics files I created, I placed a #Delay command between each one so the sequence would not fly by so fast we would miss it. I also added a prompt just like the one for the background story, so the player could skip the introduction, after all who wants to watch it every time they start the game if they have already seen it.
At the beginning of the drawtitle method I added a background image and also another of the famous Jonathan Ball Midi files called begin.mid. The drawtitle method is pretty straight forward and easy to follow. Told you it was very easy to add a Movie Style Introduction.
A word of caution here, in order for the above code to work, you must have the graphics files and media files in there proper directories. You need to be sure you have downloaded the DFGraphics6.zip and DFMedia6.zip files and extracted them into the proper directories as instructed near the top of this lecture.
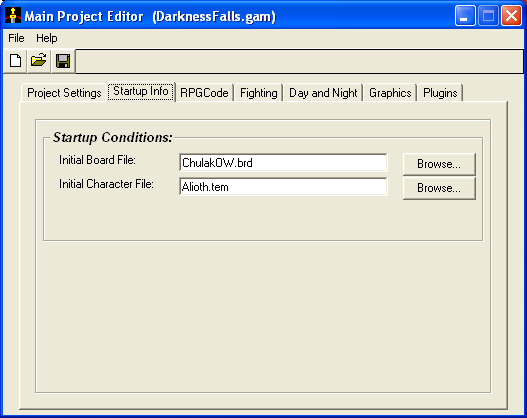
Finally due to a few of the students mentioning to me about the ChoosePlayer method, I have made a little change to it as well. I took out the #DestroyPlayer and the #AddPlayer commands from the male choice, and changed the #DestoryPlayer command in the female choice to use the Alioth.tem character template. In order for these changes to the ChoosePlayer method to work you need to set the default character to be Alioth.tem in the Main File, do this by loading up the Main File Editor, you should know how to do this by now, and clicking on the Startup Info Tab, and changing the Initial Character File: field to Alioth.tem just like the picture below.
This makes for a much more efficient ChoosePlayer method. Thanks to those students who mentioned this.
Some Cautions About The Toolkit.
In the community version of the RPGToolkit there is a little bug with the PakFile Manager. It does not handle graphics very well, therefore when you pack the game file, you may notice some graphics missing, such as enemy graphics and animations. Also you may notice your NPCs leave copies of themselves behind when they move around. Since this is a bug in the PakFile Manager, I will not count it against your grade if these things seem to occur in your .tpk file.
Another word of caution, when you pack the game file using the PakFile Manager it takes EVERY file in the subdirectories for your game and packs them into the .tpk file, so if you have files in these directories that are not used in the game, they are packed anyway, to cut down on the size of the .tpk file, you may want to remove any files not being used by your game.
Well, thats it for another lecture. This one does not contain as much as the last two did, but the length of the changes to the start.prg program make up for the lack of content.
Stay tuned to this Web Site for the next lecture where we will get into Special Moves and What ever else I have room to add to it.
Please be sure to do any assignments I add to this weeks lecture, and turn them in.
Bye Bye Birdie!
This is the end of the sixth lecture. It is now time for you to continue on to the assignments and to answer any quiz or survey that I might add to this weeks work.
Good luck!
Ferlin