|
|
|
Written by Ferlin Scarborough.
Goal of the lecture
The goal of this lecture is to teach the student how to add Special Moves to a game,
also to explain how to layer tiles, and create random NPC responses.
WARNING: This lecture contains a ton of images and therefore may take longer to load.
Getting In Contact With The Teacher.
If you need to contact me, use either my email at gameprogramming.org or use the course forum. If you have any questions, the course forum is a good place to see if there is anyone who can help you, and you would probably get a faster answer than from me.
Resource Files For This Lecture.
There are a few resource files available for this lecture, so now would be a very good time to download those and install them, below is a list of the resource files and where they need to be installed (Unziped).
The path names listed below assumes that you installed the Toolkit into its default directory, if not you will have to modify these paths to suit your needs.
To The Dungeon With Them!
Adding A Dungeon Or Cave.
Most RPG Games have Dungeon(s) or Cave(s), so let's add one to our Darkness Falls Game. First let's add us an entrance to our dungeon to our Over World map, I added mine at location 15,3 like this.
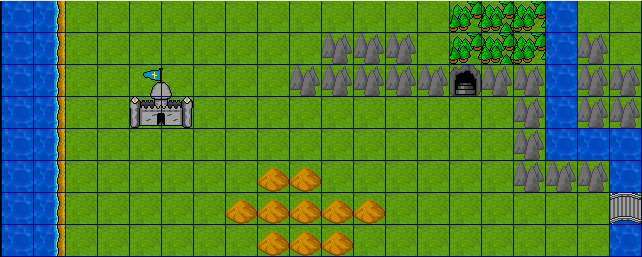
Cave entrance added to tile 15,3 on our Over World Map ChulakOW.brd.
Now that we have added an entrance, we need to create our dungeon. Below are some screen shots of what the 4 different levels of our dungeon looks like. The tiles for creating the dungeon are located in the Dungeon.tst tileset included with the resources for this lecture.

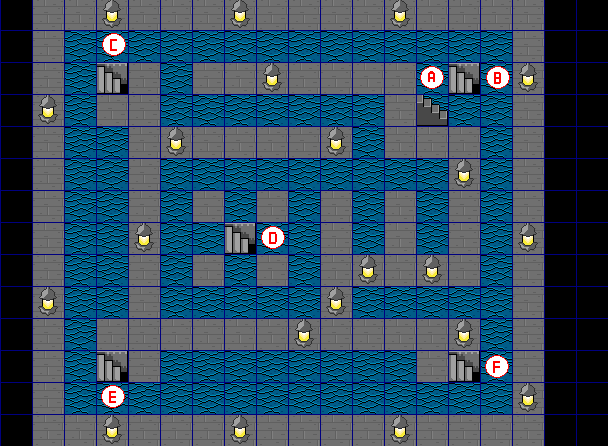
Dungeon Level 1. Dungeon1L1.brd
![]() marks the spot where
the player warps into the dungeon from the Over World Map.
marks the spot where
the player warps into the dungeon from the Over World Map.
Board Size 22X22
Dungeon Level 2. Dungeon1L2.brd
Board Size 19X14

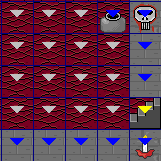
Dungeon Level 3. Dungeon1L3.brd
Board Size 22X22
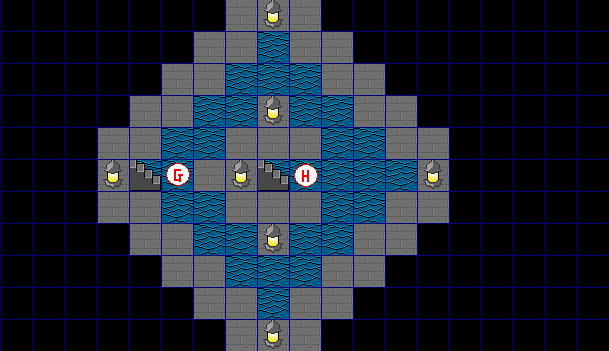
Dungeon Level 4. Dungeon1L4.brd
Board Size 19X11
I have given a letter representing each set of stairs in the dungeon, and the corresponding stairs on the other levels, so you can tell where each one leads. Create the above Dungeon boards, given them the names listed beside them in BOLD type. After you have created these boards then set up the warp tiles on the stairs so they warp to the proper areas in the other boards placing the player at the tile after the stair case, so they don't just warp right back. Since there are plenty of lanterns in the dungeon we do not need to change the ambient effects for the board to dark, leave it light if you want.
Whew, quite a lot of work wasn't it? Now lets create some special enemies for our dungeon. First lets create a Fight Background for our dungeon.
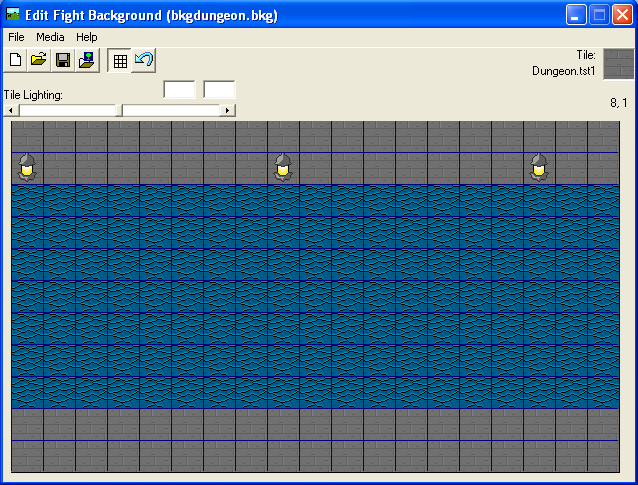
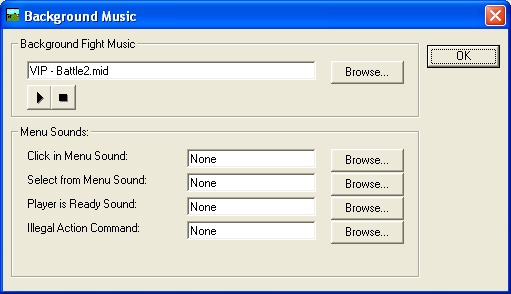
Set the BackGround Music by clicking on the Media Menu then clicking on Background Music, and set it to VIP - Battle2.mid. Save this BackGround as bkgdungeon.bkg.
Now let's set up our dungeon boards for fighting, load up each of the 4 dungeon boards and make the following changes to them.
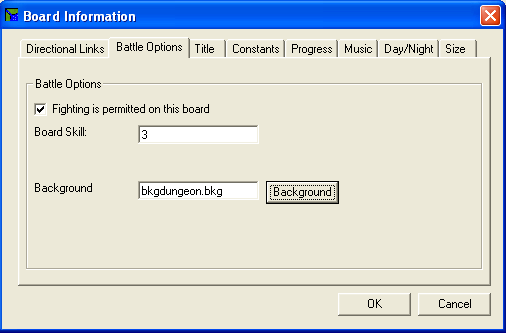
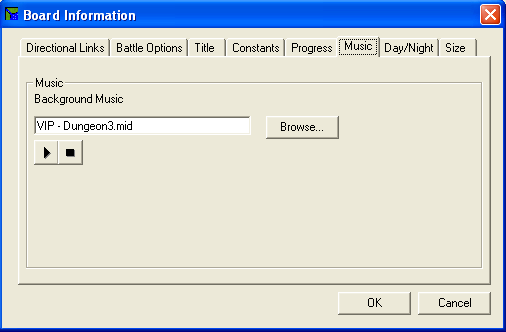
Under the Board Settings Menu, then the Board Information option, click on the Battle Options tab, click on the Fighting is permitted on this board checkbox then set the Board Skill: field to a value of 3. Next set the Background field equal to bkgdungeon.bkg. Then click on the Music tab and set the Background Music field equal to VIP - Dungeon3.mid, then click the OK button. And save your board.
Make these same changes to the other 3 dungeon boards. Now you have your dungeon playing background music, and have it set up with a dungeon background for fighting, also the fighting is enabled, and any enemies with a Skill Level of 3 will show up to fight the player while they are moving through the dungeon.
Dungeon Enemies!
Add Some Enemies For The Dungeon.
Now that our dungeon is set up ready for a fight, let's add some special enemies just for our dungeon. Add the following enemies to the game. I have added the tiles for the enemies to the Enemies.tst tileset. Available with the resource files for this lecture. If you have not done so, then please download these resources and install them as noted at the top of this lecture.
Dungeon Enemy: Dungeon Guard

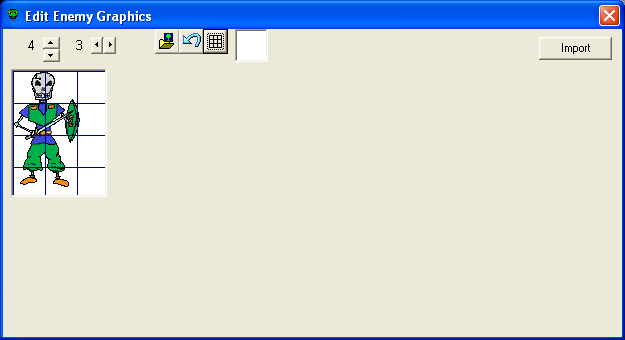
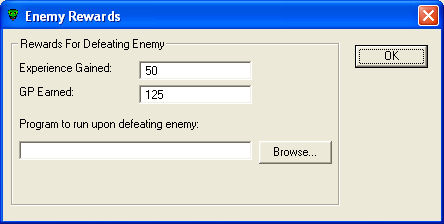
After setting up this enemy like the above screen shots, then save this enemy as DungeonGuard.ene, and add the enemy to the game in the next available slot. Set the Skill Level as 3, when you add this enemy to the game.
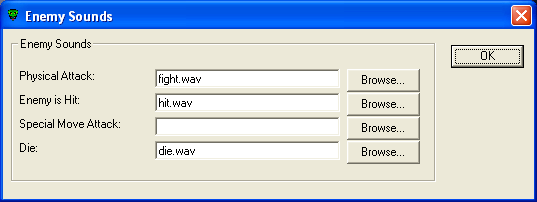
NOTE: All enemy sounds for the Dungeon Enemies will be set the same as the Dungeon Guard Enemy. Do NOT worry about the Special Moves button yet, we will be getting back to setting up the Special Moves further down in this lecture.
Dungeon Enemy: Horse Man
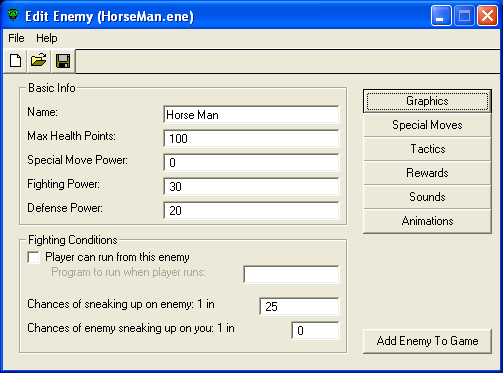
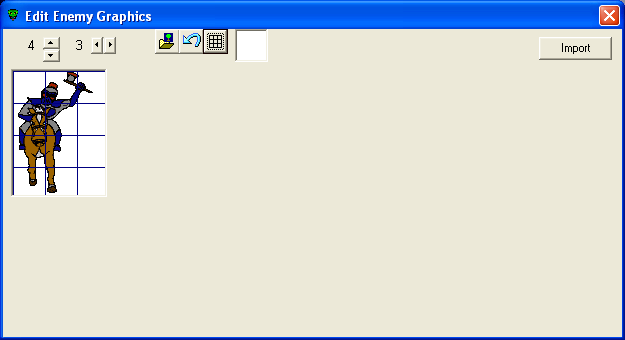

Save this enemy as HorseMan.ene, and add the enemy to the game in the next available slot. Set the Skill Level as 3, when you add this enemy to the game.
Dungeon Enemy: Magician

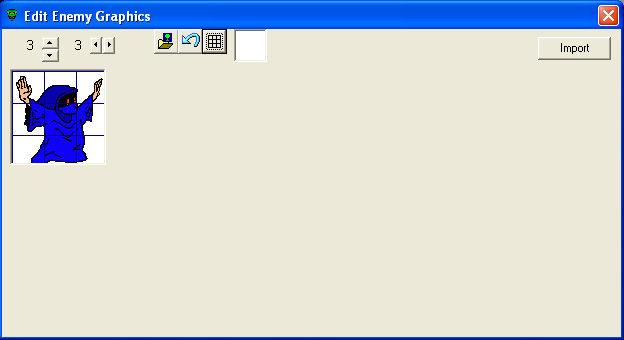

Save this enemy as Magician.ene, and add the enemy to the game in the next available slot. Set the Skill Level as 3, when you add this enemy to the game.
Dungeon Enemy: Red Snake
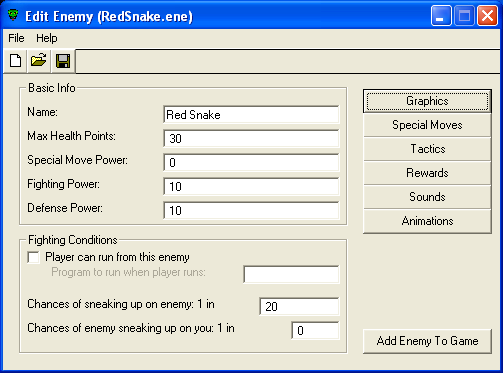
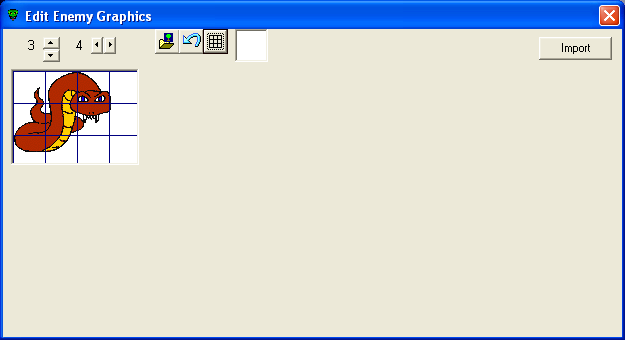

Save this enemy as RedSnake.ene, and add the enemy to the game in the next available slot. Set the Skill Level as 3, when you add this enemy to the game.
Dungeon Enemy: Scorpion


Save this enemy as Scorpion.ene, and add the enemy to the game in the next available slot. Set the Skill Level as 3, when you add this enemy to the game.
Dungeon Enemy: Green Dragon
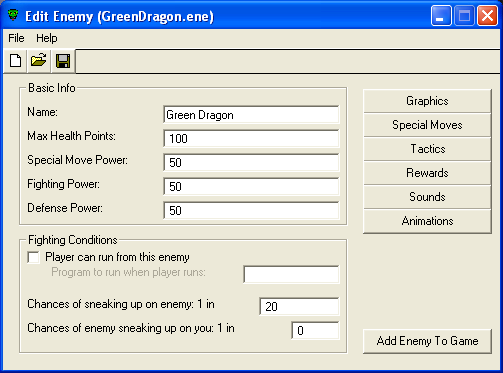
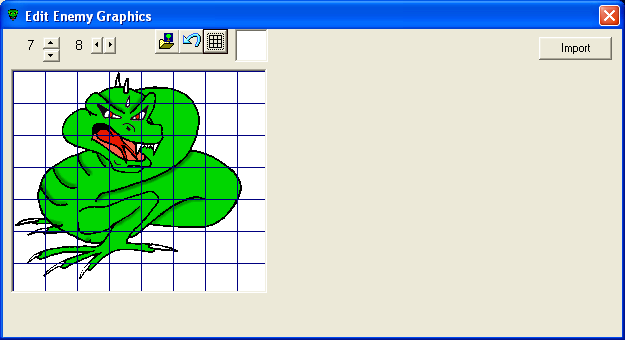

Save this enemy as GreenDragon.ene, and add the enemy to the game in the next available slot. Set the Skill Level as 40, when you add this enemy to the game. No the 40 Skill Level is not a typo, I have special plans for our Dragon so it needs a different Skill Level than the rest of the Dungeon Enemies.
<GRIN>, The old teacher is really working you this time around.
Time For A Little Break.
What do you say we take a break and have a little fun before we continue with the lecture?
Load up your ChulakOW.brd board, and set a warp tile on the dungeon entrance.
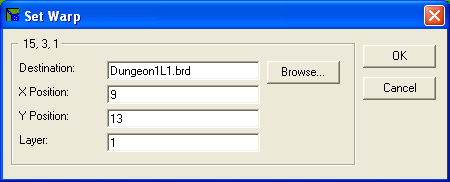
If you set your Dungeon Entrance on the Over World board in the same spot as mine it should be located at 15,3, when you set the warp tile there, the above dialog window should appear, set the field values the same as above, this should place the player at the Start Here location (in the above screen shot for Level 1) at the foot of the stairs in Level 1 of the dungeon. Now save the board to save the warp tile change you just added.
Now for the fun part. If you set everything up right, you should be able to run the game and enter the dungeon, and wander around and fight the new enemies. Except for the Green Dragon that is, it will come along shortly.
Warning: The enemies in the cave are quite powerful, if you want to stand a chance of beating them, you will need to go to the cemetery and fight a little while to build up your level and hit points.
Isn't That Special?
Special Moves.
Before we add our Special Move lets prepare a few things to build up to it. First lets add a new item like the one below.
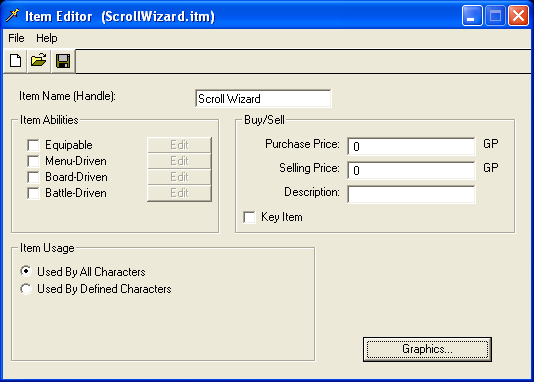

The graphic for the Scroll Wizard is in the Enemies.tst tileset. Save this item with the name of ScrollWizard.itm. Next we need to prepare an animation to go along with our Wizard, we will be using this animation a little further down in the lecture.
In the resource files there are some graphics named WizBurn1.png - WizBurn4.png these are the graphics we will use to create our animation with. Load up the Animation Editor and set it up as pictured below, for frame 1 of the animation use WizBurn1.png, frame 2 use WizBurn2.png, frame 3 use WizBurn3.png and frame 4 use WizBurn4.png, be sure to set your transparent color to the white background like shown, then click back to frame 1 and run the animation, set the speed like the picture below, that should slow it down to a decent point to view it properly.
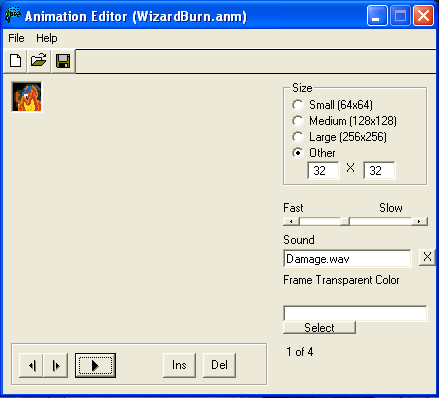
As shown above set the Sound field equal to Damage.wav, which was supplied with the resources for this lecture. Now save the animation with a name of WizardBurn.anm.
While I am thinking about it the burning wizard would be something I could use to show you Tile Layering.
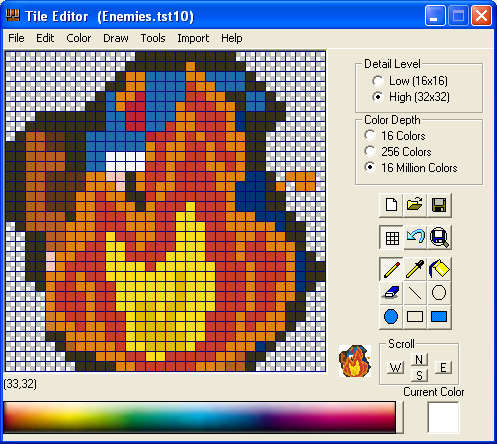
Load up the Tile Editor and in the Enemies.tst tileset there are some burning tiles, if you load up the first one and look at it, you will see that I have made all the areas of the tile except for the burning frame to transparent.
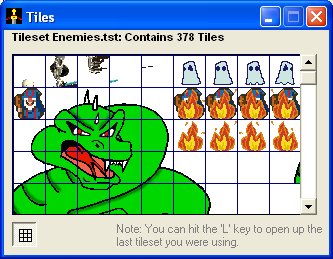
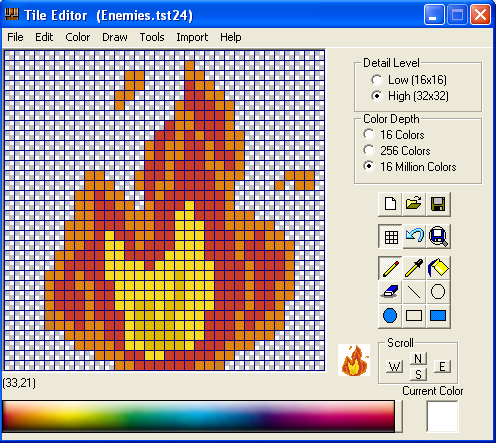
Transparency in the Tile Editor is shown by the silver and white checked squares, as seen in the screen shot above. Whenever you use the eraser to erase part of a tile it is turned transparent.
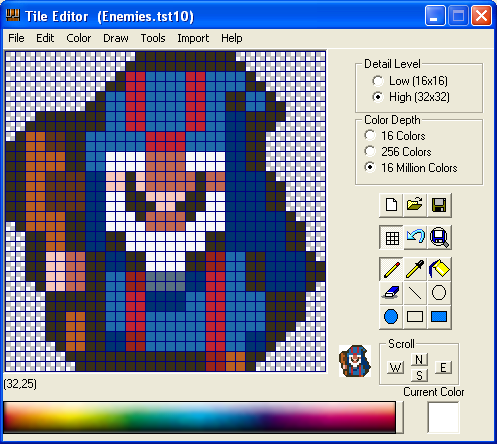
Now load up the Wizard tile into the Tile Editor.
Next click on the Tools Menu, and choose the Layer Tile option, that should pop up the Layer Tile window shown below. Click the Open Tile button and choose the first burning flame tile.
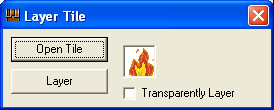
Now click on the Layer button, and you should see how the burning flame tile was layered over top of the Wizard tile, leaving the Wizard showing through the transparent parts of our burning flame tile.
You can see where Tile Layering can be a very useful tool in creating tiles to give the effect of one thing behind another, such as grass and ground behind a tree tile, where the grass and ground show through the leaves and branches of the tree.
Now back to the task at hand, lets get on with preparing things for our player to gain a Special Move.
Load up the Board Editor and load in the Dungeon1L3.brd board.
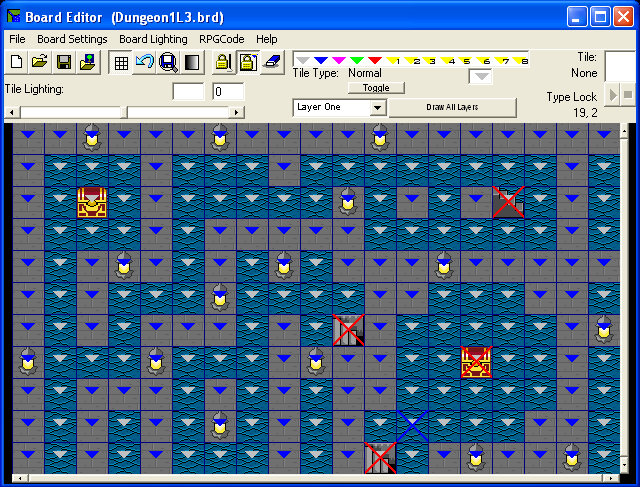
Notice the tile with the Blue X on it, just above and to the right of the stairs into the room in the middle right of the level. This is where we will place our Wizard.
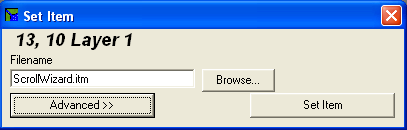
By now you should know how to add an item to the board under the RPGCode Menu. Let's add the ScrollWizard.itm item we added earlier to this tile, in my board this tile is located at 13,10, you may have to do some adjusting if your board is not exactly like mine.
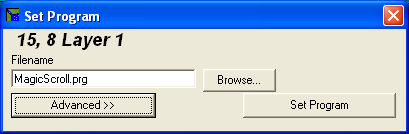
Now, we need to add the program to this same tile that controls our Wizard, add the following program.
|
* Check Wizard! Variable to see if player has already met the Wizard. |
Save this program as ScrollWizard.prg. Now set this program to the same tile as the Wizard Item on our board.

Now that the Wizard is taking care of, let's work on the chest in the room. Remember the Magic Scroll Item that we added to our game in an earlier lecture? Now it is time to put that Item into our game, let's place it in the chest we have here in the room.
Create the following programs to deal with the chest. Which is located at 15,8 on my board.
|
#If (Chest2Empty! = 0) |
Save this program as MagicScroll.prg.
|
#LayerPut(15,8,1,"Dungeon.tst9") |
Save this program as OpenChest2.prg.
Look familiar do they? They should since they are almost identical to the chest programs we have done so far in these lectures.
Now set the program for the chest on the board.
Then set the program to replace the tile with the open chest tile.
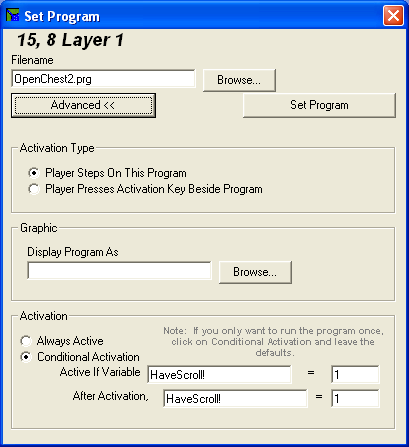
Notice that the OpenChest2 program is set using conditional activation.
There now we have placed the Magic Scroll where the player can get it, and read it, and learn the famous Lightning Bolt Spell, which will be our Special Move we will add next. If you would like to, you can save everything and play through the game to see what effect all this has accomplished.
Time For Something Just A Little Special.
Now that we have a way of acquiring our Special Move, let's start adding it to our game. First we will make an animation to show when the player uses the Special Move. Load up the Animation Editor, and create a Lightning Bolt animation. Use the graphics in the resource files available for this lecture. The files are named bolt3a.png, bolt3b.png and bolt3c.png.
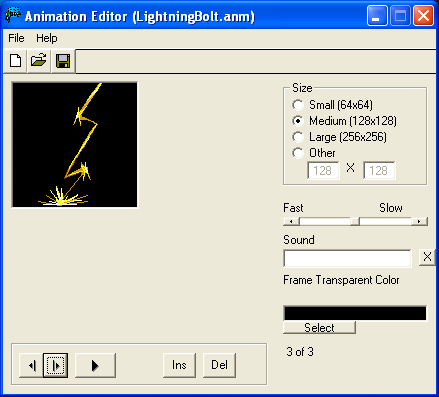
Notice in the picture above of the third and last frame of the animation, that the transparent color is the black background, do not forget to set this on the first frame. Also notice that the size is set to Medium (128X128), and the speed is set about half way. Play the animation back from the first frame after you add all 3 frames to see the effect of the animation. Now save the animation as LightningBolt.anm.
That takes care of the eye candy for the Special Move, now it's time to add the Special Move
to the game. We do this by clicking on the Special Move ![]() button.
button.

Let's add our Lightning Bolt Special Move, enter the values as shown in the picture above.
The name is the name displayed during battle, the Fight Power is the amount of Fighting Strength the move has. The Amount of SMP Removed From Target is the amount of SMP removed from the enemy the Special Move is used against (usually 0). Special Move Power Consumption is the amount of SMP taking away from the player for using this move. Description is a text description that is shown when the player asks for information about the Special Move. The RPGCode Program is a program that is run when the Special Move is used, this program is run before any damage is applied to the enemy. The Status Effect is a condition a player or enemy gets for a few rounds of fighting that will help them or hurt them, say for instance the Special Move was a sleep spell, this would put the enemy to sleep so they could not fight back for a few turns. Effect Animation is an animation created with the Animation Editor, that is played when the Special Move is performed. The Battle-Driven checkbox, is to set the Special Move so it can be used during battle, this is usually where most Special Moves are performed. Finally the Board-Driven checkbox, says that this Special Move can be performed from the menu, like a curative Special Move, this way the player can use this Special Move from the menu at any time. While we are talking about curative Special Moves, any Special Move can be made a curative move by setting the values as negative amounts.
Once you have set the Special Move up as pictured above, save it as LightningBolt.spc.
Now that we have added our Special Move, it is time to give it to our player. Load our character up in the Character Editor, then press the Special Moves... button.
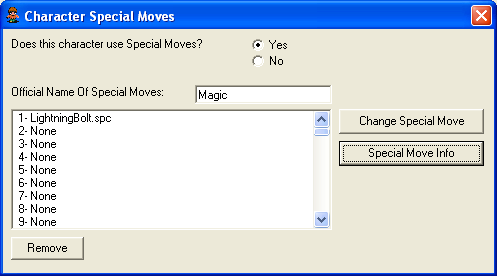
First we need to check the checkbox for Yes, on the field that is labeled Does this character use Special Moves?. The next field labeled as Official Name Of Special Moves: is a name given to the Special Moves, it is usually the name of a class of Special Moves, (i.e. Magic, Martial Arts etc.) This name can be whatever you want, but common sense tells you it should be descriptive of the special abilities of the player. Give this field a value of Magic, this is what will show up on the fight menu when you get into a fight with the enemy.
Next click on the first slot in the list of Special Moves, then click on the button labeled Change Special Move, and choose the LightningBolt.spc Special Move. But hold on just a second, we don't want our player to be able to use this Special Move until they have found the Magic Scroll and learned the Lightning Bolt Spell. How do we accomplish this task? Sounds like it may be a little difficult doesn't it?
Actually it is very simple indeed, click on the button labeled Special Move Info.
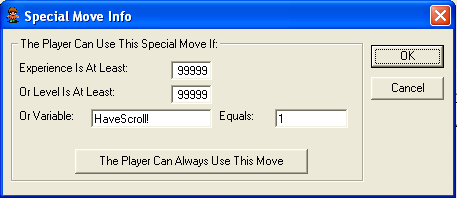
The Special Move Info dialog window allows us to set the conditions under which the character can acquire a Special Move, in this instance we want them to acquire the Special Move from the Magic Scroll, remember in the Magic Scroll program we set a variable when the player was given that Magic Scroll called HaveScroll! to a value of 1, here we check that constant variable to see if the player has obtained the Magic Scroll or not.
Note: Say you wanted to add a Special Move that the player could only do if they had an experience of 800 or above. You can set a minimum experience, but the three conditions in this menu still have to be set. For example, you could set the minimum experience to be 800, but if the minimum level is still zero, then the player will still do this move, since his level will always be higher than zero. Make sure you set the other values to impossibly high amounts, so that only the condition you want met is used to determine if the player does the move or not.
Set the Special Move Info as shown above then click the OK button and exit out of the Special Move and save your character to save it with the Special Move added, while we are thinking about it, make the same changes to your other character, in other words be sure to add the Special Move to both Alioth and Lydia.
Now save your game and run it, go to the dungeon, get the scroll, the go to the cemetery and ZAP some enemies....Fun isn't it?
What You Talking About Willis?
Random NPC Responses.
When David Royal turned in his assignment for lecture 5, he had made his NPCs in the town of Abydos so they gave random responses, I had seen this before many times in RPG Games, but had never implemented it myself, when I saw that, I thought it would be something to throw into one of my lectures, nice touch David.
There is not much to adding random responses, just create a program like the one below.
|
* Random Abydos Chatter. |
All you have to do now is to save the program with a name like RandomAbydosTalk.prg, then when you set the RPGCode Program for the talking of your NPCs set it to RandomAbydosTalk.prg. The effect will be that the NPCs you set this program on will respond to you when you walk up to them by randomly picking one of the 3 responses, so you don't alway get the same conversation from the same NPC. Look up the #Random command in the RPGCode reference to see how this works.
An Ogre Is Like An Onion, They Have Many Layers!
Board Layering.
To top off this lecture I want to talk about Board Layering. This seems to confuse some people a little, so I will explain a little bit about it. Let's create an entrance hall for our Castle, in this entrance hall we will have a balcony walk way that goes around the walls of the room, where you can look down into the main entrance hall. Board Layering is how we will accomplish this little feat. First create the Entrance Hall. The tiles I used to create the Entrance Hall are in the castle.tst tileset.

Be sure that the board is set to Layer One ![]() when you create it.
when you create it.
Set the size of the board to 38X22, twice the default dimensions, this gives it a more roomy look. After creating the above board save it with a filename of EntranceHall.brd.
If you have not already done so set your tile types to block the tiles you want blocked, also
notice that the stairs in each corner has a tile type of Stairs To Layer 2, a yellow
triangle ![]() is the
symbol that represents a tile of this type.
is the
symbol that represents a tile of this type.
Now is a good time to save the board again. That takes care of Layer One,
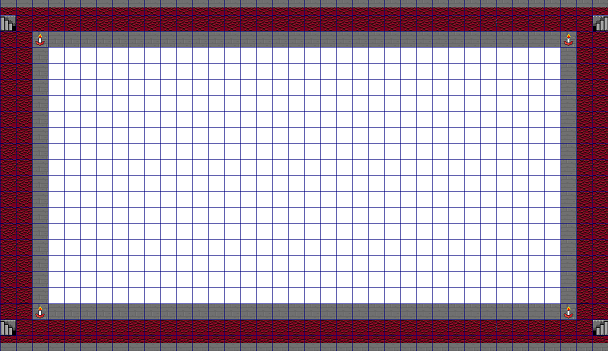
now let's build Layer Two. Click on the down arrow next to ![]() so that it changes to Layer Two. Whoa, don't PANIC! The board will
turn solid white, but don't worry you have not lost all that hard work you put into Layer One, it
is still there, the board is pure white, because we are now looking at the tiles on Layer Two
of the board, which there are not any since we have not added them yet. Let's add
our tiles for our balcony around the Entrance Hall.
so that it changes to Layer Two. Whoa, don't PANIC! The board will
turn solid white, but don't worry you have not lost all that hard work you put into Layer One, it
is still there, the board is pure white, because we are now looking at the tiles on Layer Two
of the board, which there are not any since we have not added them yet. Let's add
our tiles for our balcony around the Entrance Hall.
Note: I did not take the time to create a 3D look to the blocks around the center of Layer 2 here, but if you do that it will give it more depth and a more realistic look.
Now if you press the Draw All Layers ![]() button, it will draw layer one under layer two so you can see the results. All
the white area will show layer one through them, they are the transparent tiles.
button, it will draw layer one under layer two so you can see the results. All
the white area will show layer one through them, they are the transparent tiles.
Another Note: Make the block tiles around the center of layer two blocked tile types, otherwise the player will be able to walk out over layer one and look like they are walking on air (of course if your character is Super Man then you may want that effect).
Be sure to set all the stairs on Layer Two to a tile type of Stairs to layer 1. If you set the tiles properly the stairs on level two and level one should be in the exact same spot. Now set the background music for the board to begin.mid, now save the board again. Trust me it pays to save and save often.
Next let's set the Warp Tiles for our new board, set the tiles in the middle bottom of the board, on the bottom of the rug to warp tile. If you set your board up just like mine, then the tiles would be the ones located at 19,22 and 20,22 and 21,22 and 22,22 and 23,22. Set the board to warp to as ChulakOW.brd, and set the X and Y to 5 and the Layer equal to 1, for all 5 of these tiles. Once again save the board.
Now load up the ChulakOW.brd, and set the two tiles on the castle bottom to be warp tiles, in my board they are located at 5,4 and 6,4. Save your Over World board.
There you have it yet another lecture completed. Stay Tuned for lecture 8, where I hope to have a little surprise waiting for you. No bribing the Teacher you will just have to wait to see what the surprise is. :)
Sorry for the delay on this lecture I hope it was worth the wait? Due to piecing this lecture together a little at a time, it is very highly possible that I have left some thing out or left in some bugs, if so please let me know so I can get them fixed.
Please be sure to do any assignments I add to this weeks lecture, and turn them in.
Asta Lavista Baby!
This is the end of the seventh lecture. It is now time for you to continue on to the assignments and to answer any quiz or survey that I might add to this weeks work.
Good luck!
Ferlin